Creating and editing your dmSwitchboard12 plan
This note provides a comprehensive guide to the Plan Editor for dmSwitchboard12. It tells you how to create and update a Switchboard Plan.
If you already have a Plan, you can fine-tune it by adding more advanced functions. See the Advanced Options for how to do this.
Contents
Duration
Theory
Pre-requisites
Setup Data
Step 1: Access the Plan Editor
Step 2: Create and name a new plan
Step 3: Enter your company details
Step 4: Company tab - advanced options
Step 5: Enter your reception details
Step 6: Enter your teams' details
Step 7: Teams tab - advanced options
Step 8: Allocate personal extensions
Step 9: People tab - advanced options
Step 10: Enter your phones' details
Step 11: Phones tab - advanced options
Step 12: Activate your plan
Related Content
Duration
It should take you about ten minutes to create a new Plan.
If you are editing an existing Plan then, depending upon what you are doing, edits should only take a few minutes.
Theory
Using plans you can adapt your switchboard to the shape of your business.
- There is no pre-set shape or structure for a switchboard - create a structure that suits you
- dmSwitchbaord12 is easily tailored to the size and structure of your organisation
- Create multiple plans to cover different scenarios (e.g. holidays or special events)
- Designate a 'Disaster Recovery' plan that enables you to remain contactable, even if your office is inaccessible
dmSwitchboard12 is integrated and open. It has been designed to integrate fully with other dmClub call handling products, as well as with third-party systems and VoIP phones.
Allocated numbers (numbers already in use)
If a number in a DDI Number drop down is marked with an asterisk (*) it means that the number has already been allocated within a Plan. You can use a number in more than one Plan (as only one Plan can be active at a time) but you should ensure that a number is not used twice in the same Plan.
When you place the cursor over the number a tooltip is displayed telling you where the number has been used.
Pre-requisites
You will require the following to create or edit a Plan:
- dmSwitchboard12
- dmCalls12 (which comes with every switchboard)
- Some phone numbers
Setup Data
| Data Name | Usage | Example | Rule and Origins |
|---|---|---|---|
| <DMID> |
Usually the email address with which you signed up. it's shown at the top of your Clubhouse. |
fred@smithco.com |
Required |
| <DM Password> |
The password to sign into your Clubhouse. |
V3rr1S3cr3t |
Required |
| <Opening times> |
The hours that your company, and its individual teams, are open and can take calls. |
9-5.30, Monday to Friday |
Required |
| <Reception numbers and their titles> |
You can have more than one Reception, each with its own name and number. |
Main Reception 555-1234 |
Required |
| <Team names and their individual numbers> |
You can have several teams. They will each have a name and a number. |
General Enquiries - 555-9876 Sales - 555-6565 |
Required |
| <People> |
For each person given a personal extension you will require: their name; their number; their email address (for the WebPhone) and the teams to which they belong. |
Henry Smith 555-3456 Henrysmith@smithco.com Sales |
Required |
Plan your switchboard
We recommend that you download and complete the switchboard12 planning sheet before creating your first plan.
Download a completed example for some pointers as to how you should go about completing it.
Step 1: Access the Plan Manager
To access the Plan Manager:
a) Access your Clubhouse.
![]() b) In the Service Controls area, click the dmSwitchboard12 icon. Note that there will be a separate icon for each dmSwithcboard12 that you operate.
b) In the Service Controls area, click the dmSwitchboard12 icon. Note that there will be a separate icon for each dmSwithcboard12 that you operate.
The dmSwitchboard12 Control Panel is displayed.
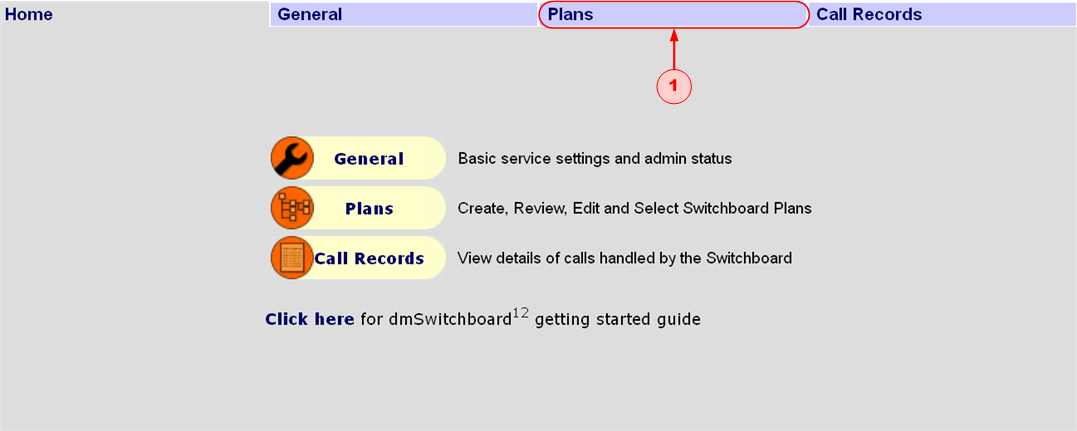
c) On the dmSwitchboard12 Control Panel, click the Plans Tab (1). The Plan Manager is displayed.
The dmSwitchboard12 Control Panel is displayed.
c) On the dmSwitchboard12 Control Panel, click the Plans Tab (1). The Plan Manager is displayed.
Step 2: Create and name a new plan
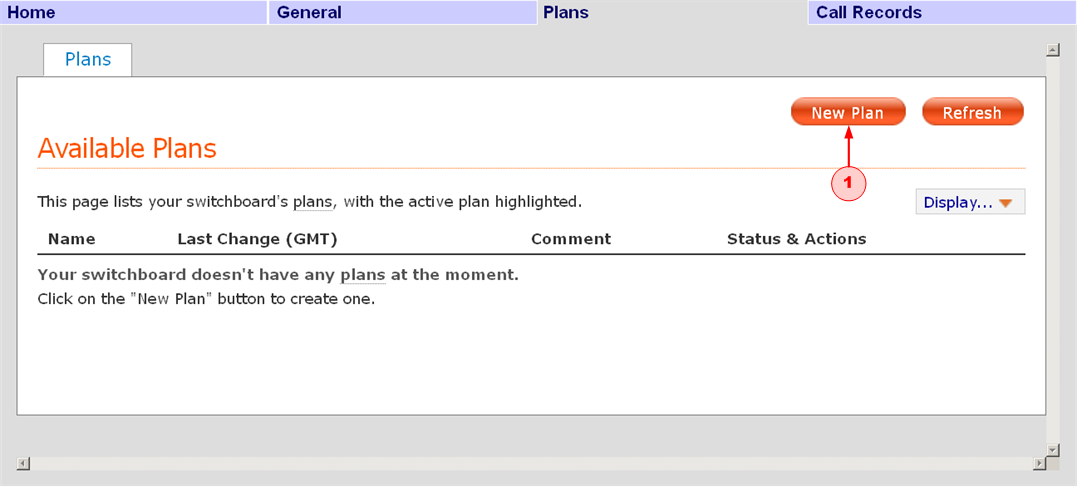
a) On the Plan Manager Home Screen, click the New Plan button (1)
The Plan Summary screen is displayed. This screen provides full details of the current Plan: it is blank in this screenshot as this is a new plan.
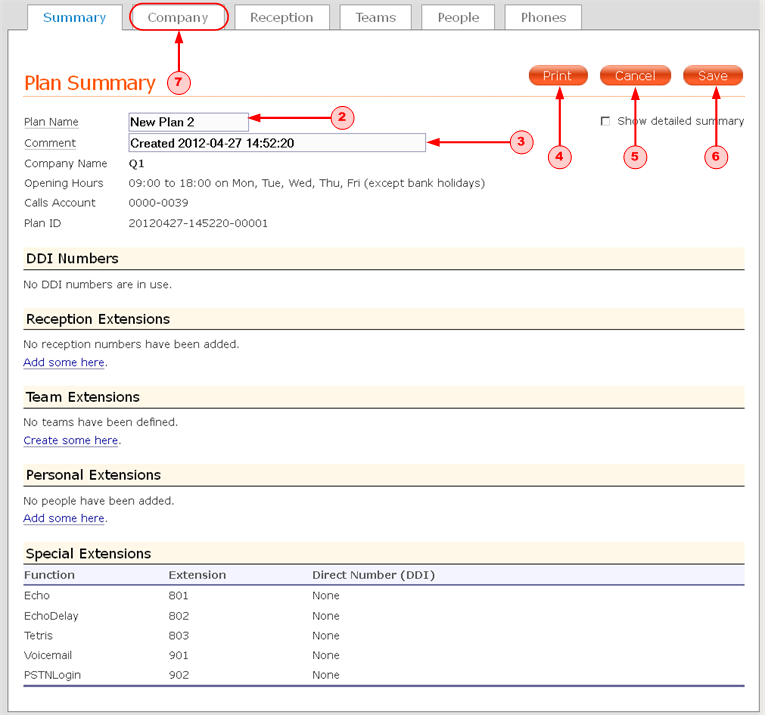
b) In the Plan Name field (2) enter a suitable name for your new plan. The field can contain up to 20 characters. Letters and spaces are permitted.
c) In the Comment field (3) enter a description for the Plan. The field can contain up to 100 characters. Letters and spaces are permitted. By default this field contains the date and time that the Plan was created.
d) If you want a hard copy of your Plan's summary click Print (4).
To quit without saving any changes, click Cancel (5).
If you just wish to make a change to this screen, and no others, click Save (6) before you exit. You are returned to the Plan Manager.
e) Once you have given your plan a name and comment, click the Company tab.
Step 3: Enter your company's details
The Company tab is used to enter:
- Your Company's name
- The days of the week that you are open, and your opening hours
- Whether you are open on English Bank holidays
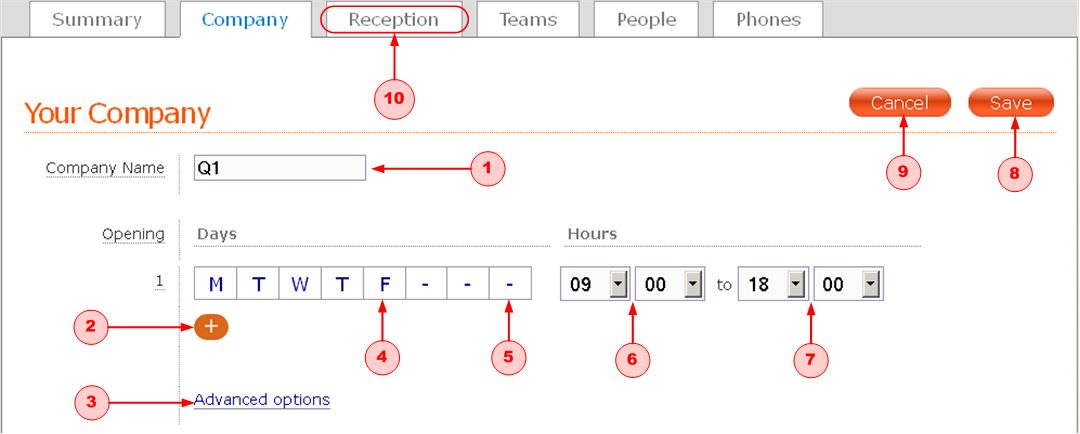
a) Type the company name into the Company Name field (1). This is the name customers hear when they call reception.
b) Now set your opening hours. Select the days of the week that you are open (4). For days you are closed click the corresponding letter and a – is displayed. If your hours vary according to the day of the week click the + sign (2) and a new row is displayed, allowing you to set a differnt set of hours for a different set of days.
c) The Advanced options link (3) allows you to specify which dmCalls12 account will be charged for PSTN connections (e.g. a mobile extension, or outbound calls).
d) Choose whether to open Bank Holidays (note that only English Bank Holidays are catered for at present). Click the box (5). There are three options:
– = Closed
* = Treat as normal working day
(use this if the hours that you open on Bank Holidays are the same as any other working day)
B = Open.
If you are open but your hours are different:
- Click the + sign (2) to create a new row
- Set the Bank Holiday box to B
- Leave the other days of the week as hyphens.
e) Use the Hours drop-downs to set your opening time (6) and closing time for each (7) row.
f) If the only changes that you are making to your Plan are on this tab click Save (8) and then exit the Editor. If you do not wish to keep your changes click Cancel (9). You are returned to the Plan Manager.
g) To save your changes and move on to the next stage, click the Reception tab (10).
Step 4: Company tab - advanced options
The advanced options on the company tab allow you to choose the dmCalls12 account used for PSTN calls, such as calls to mobile extensions andr outbound calls.
a) Click Advanced options (3).
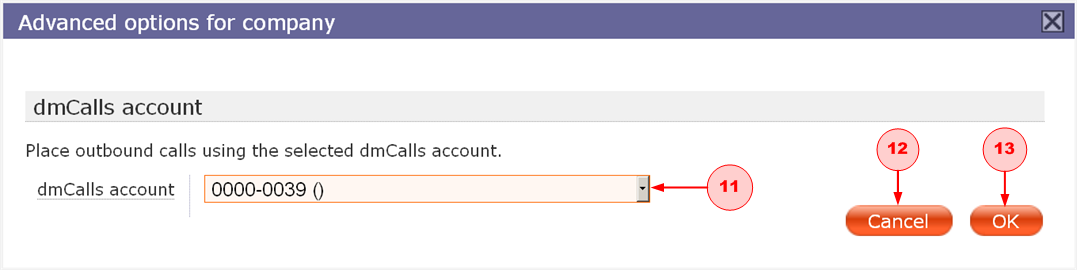
b) Select the dmCalls12 account that you wish to use from the dmCalls Account drop down (11). The list contains all of the accounts that are currently available from your Clubhouse.
c) If you are happy with your choice click OK (13), otherwise click Cancel (12).
Step 5: Enter your reception details
With the dmSwitchboard12 you can have as few as one or as many as 99 Reception numbers. You may want more than one number to fit in with your marketing campaigns or business segmentation.
Callers to a reception number hear a recorded message giving options for Team Extensions.
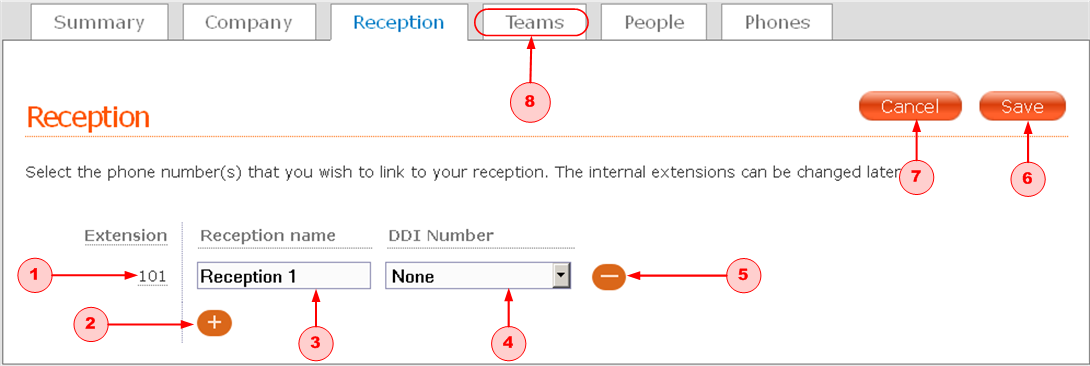
a) The main Reception extension is always 101 (1).
Type in the name that you wish to give to the first reception number (3).
If you wish to create further extension numbers, click the + sign (2).
If you no longer require a Reception extension delete it by clicking the minus sign (5).
b) Choose the number that you want to allocate to reception from the DDI Number dropdown (4).
c) If the only changes that you are making to your Plan are on this tab, click Save (6) to exit the tab and return to the Plan Editor. If you do not wish to keep your changes click Cancel (7).
d) To save your changes and move on to the next stage, click the Teams tab (8).
Step 6: Enter your teams' details
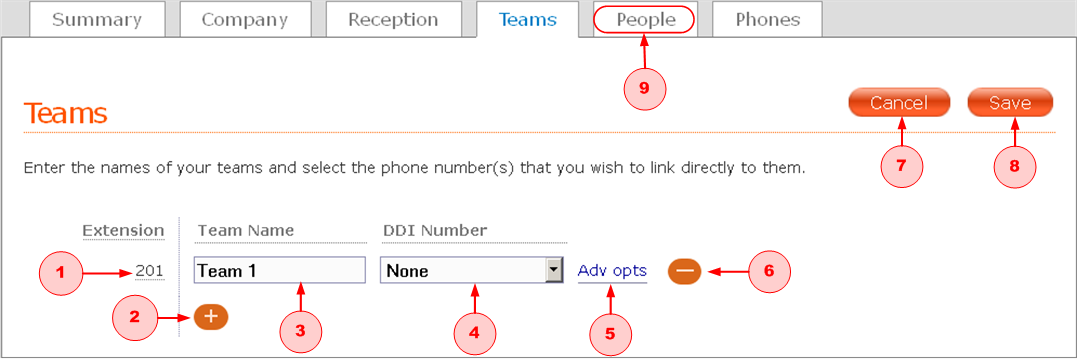
a) Team extensions start with a 2 and the first team is allocated extension 201 (1).
Type in the name that you wish to give to the team (3).
If you wish to create further extension numbers, click the + sign (2).
If you no longer require a particular team extension delete it by clicking the minus sign (6).
b) If you want to give the team a direct line allocate a number using the DDI Number dropdown (4).
c) If you would like to set Advanced Options for the team click the Adv Opts link (5).
From this screen you can set the Out of Hours message; the ring duration and tell the dmSwitchboard12 what to do if no-one picks up the phone. See step 7 below for more details.
d) If the only changes that you are making to your Plan are on this tab click Save (8). If you do not wish to keep your changes click Cancel (7).
e) To save your changes and move on to the next stage click the People tab (9). Your changes are automatically saved.
Step 7: Teams tab - advanced options
The advanced options on the teams tab allows you to set the:
- Operating hours for each team
- What the customer hears before dmSwitchboard12 takes a message
- The length of time that a phone will ring before it hangs up or diverts
- The action dmSwitchboard12 takes if an extension rings for the set time
- The email address to which voicemail is sent
- The voicemail PIN you use to access the team's voicemail account
There is a separate advanced pptions screen for each team that you create.
a) Click the Advanced options link (5) and the advanced options for the team screen is displayed.
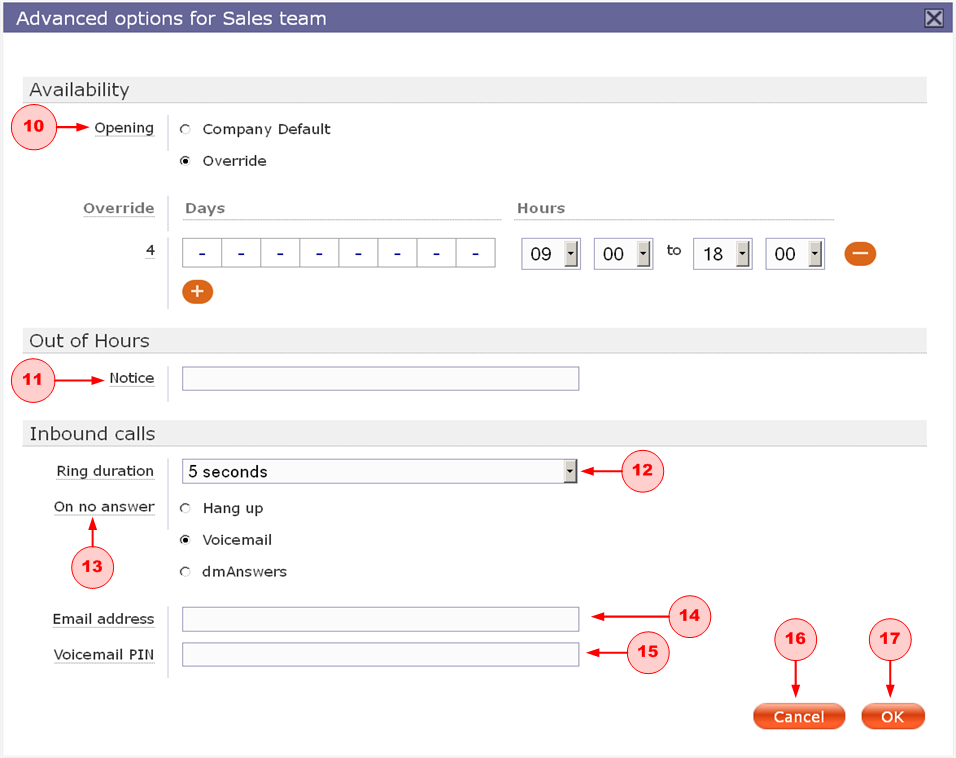
a) To set the opening hours (10) you can choose to use the company default, as set in the company tab, or to override the default and set particular times for each team.
b) The Notice field (11) is used to set the text customers hear before a message is taken. If this field is left blank, a pre-recorded message is broadcast.
Note: This message is only played to external callers, and only if you are not using your own voice prompts.
c) Use the drop down list in the Ring Duration (12) field to specify how long the phone will ring before dmSwithcboard12 takes the next action (5 seconds to 2 minutes).
d) Use On no answer (13) to specify what to do after the extension has rung for the time set as the Ring Duration.
e) Use the Email Address (14) field to set the address to which voicemail messages are sent.
f) In the Voicemail PIN (15) field you can specify the code that needs to be entered when you dial in to your switchboard before you are able to access your messages and manage voicemail setup.
g) If you are happy with your changes click OK (17), otherwise click Cancel (16).
Step 8: Allocate persaonal extensions
You use this tab to:
- Allocate extensions to individuals
- Allocate Direct Dial numbers to individuals
- Add individuals to the teams that you created on the Teams tab

a) Personal extensions start with a 3 and the first person is allocated extension 301 (1).
Type in the person's name (3).
If you wish to create further extension numbers, click the + sign (2).
If you no longer require a particular personal extension delete it by clicking the minus sign (8).
b) If the person is to have an a direct line, select the number from the DDI Number drop down (4). This means that they can be contacted directly rather than through reception.
c) Each named individual can be a member of up to three teams (you created the teams on the Teams tab). Select the required team from the Teams drop down list (5).
If the person is a member of more than one team use the additional Teams drop downs (6).
d) If you would like to set advanced options for the personal extension, click the Adv Opts link (7). From this screen you can set the person's availability and their inbound and outbound call defaults. See Step 9 below.
e) If the only changes that you are making to your Plan are on this tab click Save (9). If you do not wish to keep your changes click Cancel (10).
f) To save your changes and move on to the next stage click the Phones tab (11). Your changes are automatically saved.
Step 9: People tab - advanced options
The advanced options on the People tab allows you to set the:
- Opening hours for each person
- Meassage heard by callers before dmSwitchboard12 takes a message
- The length of time that a phone rings before it hangs up or diverts
- The action dmSwitchboard12 takes if an extension rings for the set time
- The email address to which voicemail is sent
- Voicemail PIN so that you can access and manage your personal voicemail account
- The Caller Line Identification
- The delay before the phone rings when a call is made via a team extension
There are separate advanced options for each person.
Note: The fields on this screen, with the exception of the two identified below, operate in the same way as those on the advanced options for teams, described above. See that step for information.
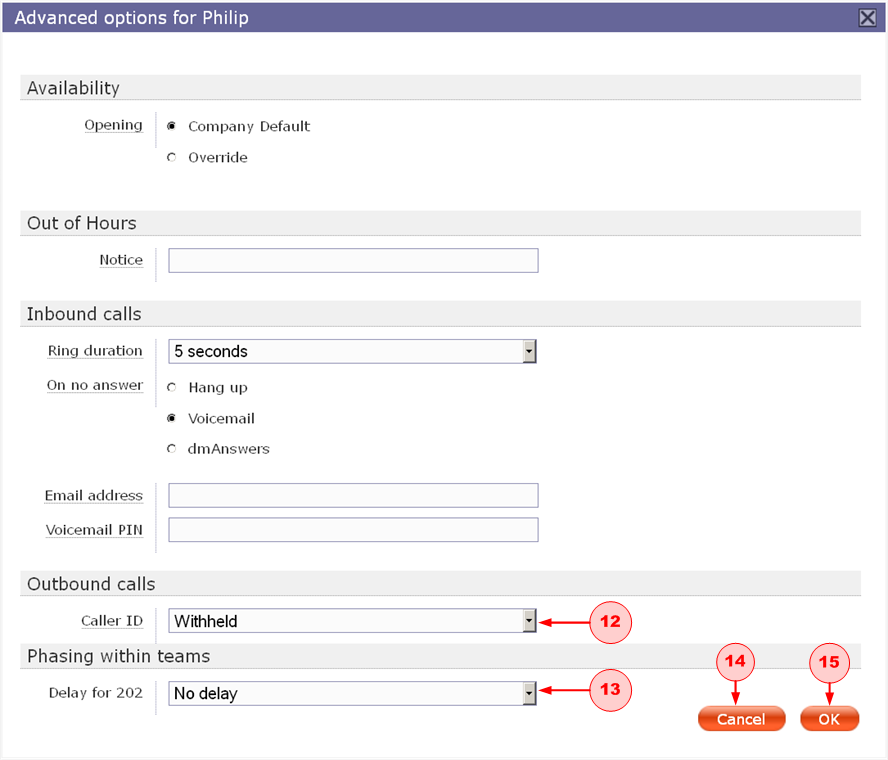
a) Use the Caller ID field (12) to set the number displayed on the recipient's handset when you call them. You can choose to:
- Withold your number
- Use one of the reception numbers
- Use one of your team numbers
- Use your personal extension
b) Use the Delay (13) field to set the delay before the extension rings when a team to which the person belongs is rung. You can set a delay of up to 30 seconds in five second increments.
This feature allows to you to make certain team members' extensions ring before others. For example, you may want a team leader's extension to ring only once their team's phones have gone unanswered for 20 seconds.
c) If you are happy with your changes click OK (15). To leave the screen without saving click Cancel (14).
Step 10: Enter your phones' details
On this tab you can select the phones that each person will use.
People can have one or all of a:
- Webphone
- VoIP phone
- Landline or mobile PSTN phone
Use the advanced options to set up a delay between VoIP and PSTN, if both are available. You can also set the PSTN delivery options
Note: If you want the named extension to use a VoIP phone, the SIP Credentials are displayed when you click the Adv opts link.
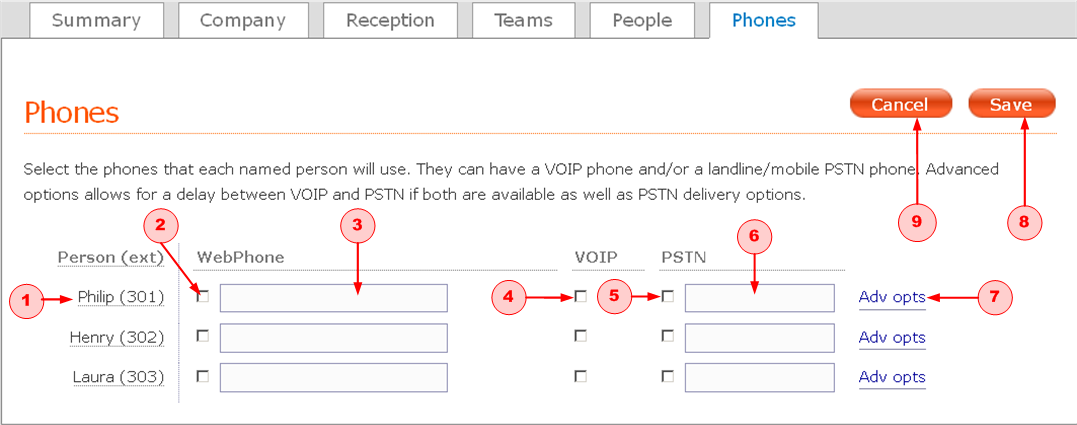
a) The named extensions are listed on the left of the tab (1). You created these in the People tab. If you want an individual to have a webphone, check the WebPhone field (2) and then type their email address into the WebPhone field.
b) Once you have typed in an email address:
- These icons -
 - are displayed next to the WebPhone field (3) if the user does not currently have a clubhouse.
 - These icons -
 - are displayed next to the WebPhone field (3) if the user does have a Clubhouse.
Before someone can use the dmSwitchboard12's webphone, they need to be sent an invitation. Click the envelope icon and complete the invitation.

The exclamation mark in the red circle indicates the invitation has not been sent. Once the webphone has been successfully created it is replaced by a green tick
c) If the person has access to a VoIP phone check the VOIP box (4). dmSwitchboard12 supports a number of third party VoIP handsets.
d) If you wish the person to use a PSTN phone (a mobile or landline) check the PSTN box (5). Type in the number (6).
Note: You cannot use the prefix '+' for international numbers. Instead you need to include the full code such as: '00 44 ...'
e) To view and set the advanced options for each individual click the Adv Opts link (7).
f) If the only changes that you are making to your plan are on this tab click Save (8). If you do not wish to keep your changes click Cancel (9).
Step 11: Phones tab - advanced options
The advanced options on the phones tab:
- Displays the personal extension's SIP Credentials
- Allows you to set the PSTN delay and delivery options (if you have a PSTN number)
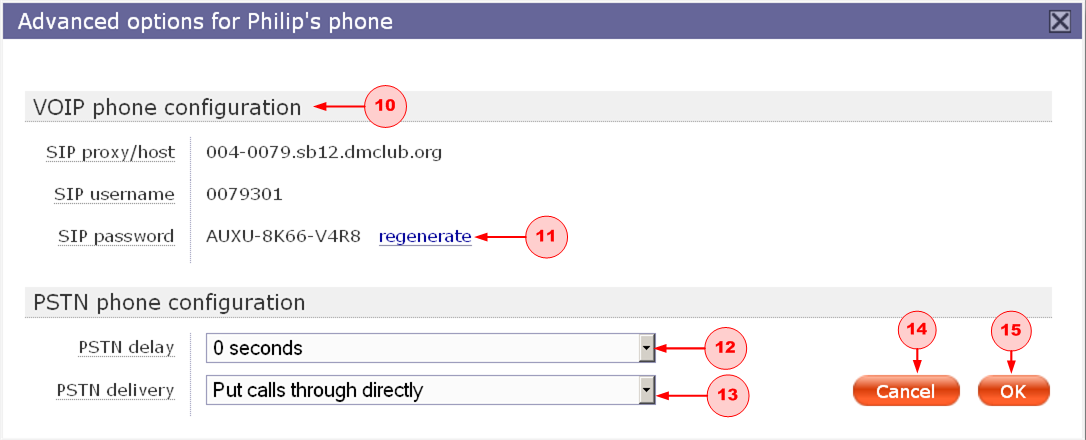
a) If you wish to set up a VoIP phone you will need SIP credentials (10). For more information see #5035 Retrieve your SIP credentials from the dmSwitchboard12.
b) For security reasons you may sometimes need to change your SIP password. To do this click regenerate (11). Note: If you click this after you have set up a VoIP phone you will need to re-enter the credentials.
c) If you are using VoIP and PSTN together you can use the PSTN delay field (12) to make your PSTN line ring only after a prescribed delay (of between 5 and 60 seconds).
d) Use the PSTN delivey field (13) to specify how you want PSTN calls to be connected. You can choose:
- To put calls through straight away
- Whisper: the dmSwitchboard12 gives some information about the call before connecting you
- Whisper + 1 to accept: the dmSwitchboard12 gives some information about the call. You need to press 1 to accept it
e) If you are happy with your changes click OK (15). To leave the screen without saving click Cancel (14).
Step 12: Activate your plan
Once you have completed all of the tabs your Plan is ready to be activated.
You can only have one Active plan at any one time. Activation takes up to 30 seconds.
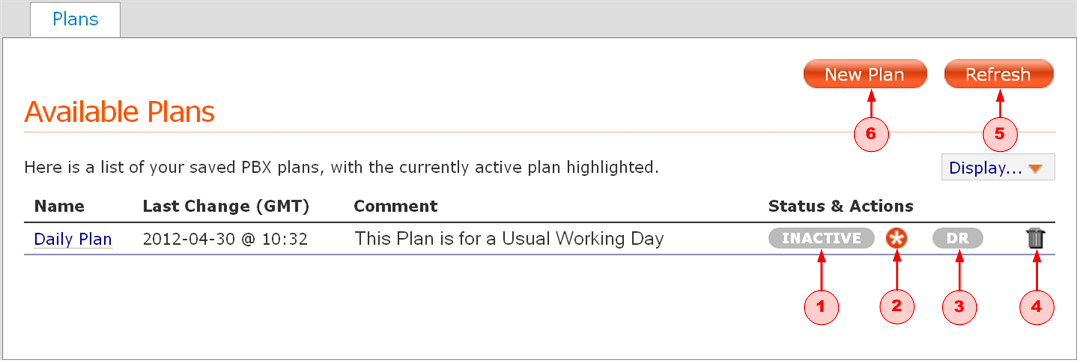
a) The plan's current status is shown under Status & Actions (1).
To activate a plan, click the star icon (2).
b) Click DR (3) to designate a plan for Disaster Recovery.
c) To delete a plan click the dustbin (4) followed by Refresh (5) to see an updated list. Deleted Plans can be 'undeleted' for up to 24 hours before they are gone for good.
Related Content
You may find these related dmNotes useful:
#5024 dmSwitchboard12 Extensions: Overview
#5025 dmSwitchboard12 Extensions: Reception
#5026 dmSwitchboard12 Extensions: Team
#5027 dmSwitchboard12 Extensions: Personal
#5028 dmSwitchboard12 Extensions: Utility