How to access the integrated WebPhone
After reading this guide, you should be able to:
- Access the WebPhone from your Clubhouse
- Install the required plugin (first use only)
- Log in to your WebPhone
- Change your WebPhone account
- Test your WebPhone
- Log out of your WebPhone
Contents
Duration
Related content
Theory
Pre-requisites
Setup data
Step 1: Launch the WebPhone
Step 2: Download the plugin
Step 3: Select your WebPhone account
Step 4: Test your WebPhone
Step 5: Log out of your WebPhone
Next steps
Duration
These instructions should take you about 15 minutes to complete.
Related Content
You may find these links useful:
Introduction to the dmSwitchboard12's Webphone
Testing the dmSwitchboard12's WebPhone
Using the WebPhone: Adding Users
Using the WebPhone: Making and receiving calls
dmSwitchboard12: Plan creation and editing
dmSwitchboard12 WebPhone: Testing
Theory
The WebPhone is fully integrated into the dmSwitchboard12 and is the quickest and simplest way to make and receive calls from your switchboard.
These instructions tell you how to access your WebPhone once a switchboard owner has allocated an extension to you. They also tell you how to download and install the necessary plugin, if you have not already done so. For the WebPhone to work on your computer, you will need to download and install this Plugin from the Zoiper Website.
Important Note: The following procedure uses Firefox (v.13.0) and Microsoft XP. The WebPhone can be used in other browsers including, but not limited to:
- Internet Explorer
- Opera
- Thunderbird
- Safari
If you use more than one browser to access your Clubhouse, you will need to install the WebPhone in each of them on first use.
Pre-requisites
In order to follow these instructions you require:
- Access to a dmSwitchboard12
- It is assumed that your personal extension has already been configured to work with the webphone and that you have received the WebPhone email notification.
Setup data
The following table lists data that you will need before you start the procedure
Data that you need to hand before you start is labelled Required in the Rule & Origins Column.
| Name | Usage | Example | Rule & Origins |
|---|---|---|---|
| <DMID> | The dmClubID is usually the email address with which you signed up, it's shown at the top of your Clubhouse. | fred@smithco.com |
Required Generated for new users |
| <DM Password> | The password that you use to sign into your clubhouse. If you already have a Clubhouse, and your browser is set to remember this, you will not need it. | V3rr1S3cr3t |
Required Needs to be created for new users |
| <Switchboard Account Number> | The account number of your switchboard service. This is included in your welcome email | 004-0051 | Required |
Step 1: Launch the WebPhone
Follow these steps:
a) If you are already logged in (you may well be, if you have just updated a Plan) log out.
b) Log in to your clubhouse. If this is the first time that you have logged in, use the ID given in the notification email that you have received.
c) When the Clubhouse is displayed, you will see an alert at the top of the window telling you that you have access to the WebPhone.

d) Click the WebPhone icon ![]() in the Webphone Zone (not in the alert).
in the Webphone Zone (not in the alert).
If you are using the WebPhone for the first time, and the WebPhone is not installed on your computer, continue from Step 2.
If the WebPhone is already installed on your computer continue from Step 3.
Step 2: Download the Plug-in
You now need to download the Plugin before launching the WebPhone. Note that, depending on your browser's security settings, some of these steps will not be required.
When you click the WebPhone icon, the following window is displayed.
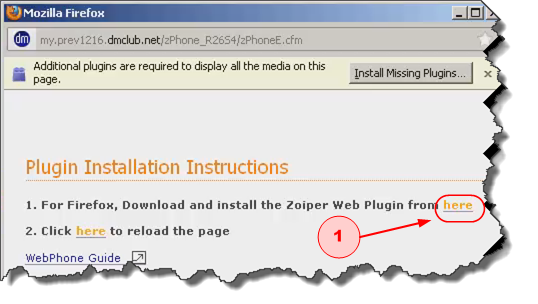
a) Click the link on the Plugin Installation Instructions Page (1). A dialog is displayed asking if you wish to save or cancel the installer.
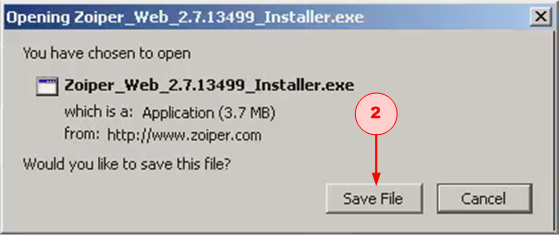
b) Click SAVE FILE (2) and the Firefox downloads window is displayed.
c) Double-click the download. A message may be displayed telling you that the file is an executable and asking you if you are sure that you wish to launch the download.
d) Click OK. A further security message is displayed asking you to confirm that you wish to run the file.
e) Click RUN. The Zoiper Setup: Installing window is briefly displayed while the files are executed and installed. The window closes once installation is complete.
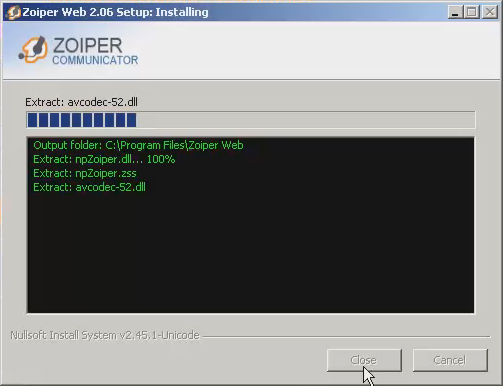
f) Click RELOAD PAGE (3) on the Plugin Installation Instructions Page. Depending on your Windows security setting, the following Windows Security Alert may be displayed.
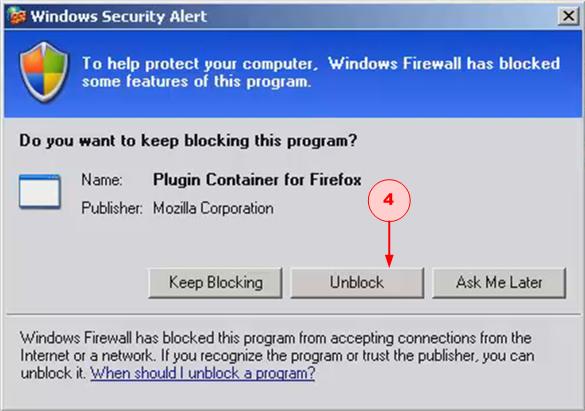
g) Click UNBLOCK (4) and the WebPhone is displayed. You should now test the WebPhone and familiarise yourself with its controls.
Step 3: Select your WebPhone account
If you have already installed the plugin, the WebPhone is displayed when you click the icon in the WebPhone zone.
A single WebPhone can give you access to all of your dmSwitchboard12 accounts. When you open the WebPhone, you are registered to the dmSwitchboard12 account which has the lowest numeric identifier.
If that is the account that you wish to use, the WebPhone is ready to make and receive calls.
If you wish to register with an alternative account:
a) Select the appropriate account from the list shown in the ACCOUNT drop-down menu (1).
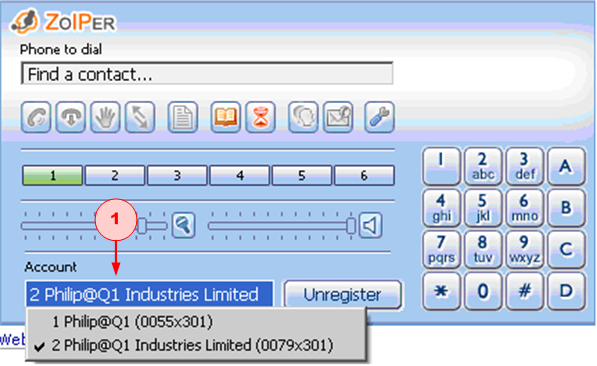
b) Your WebPhone is now ready to make and receive calls with the selected account.
Step 4: Test your WebPhone
The WebPhone comes with some buttons that let your carry out some quick and simple test to make sure that it is working.
Audio Setup
This test allows you to make sure that your microphone and speakers are working correctly.
a) Launch the WebPhone and click Audio Setup ((1), in the previous figure). The Zoiper Audio Wizard is displayed.
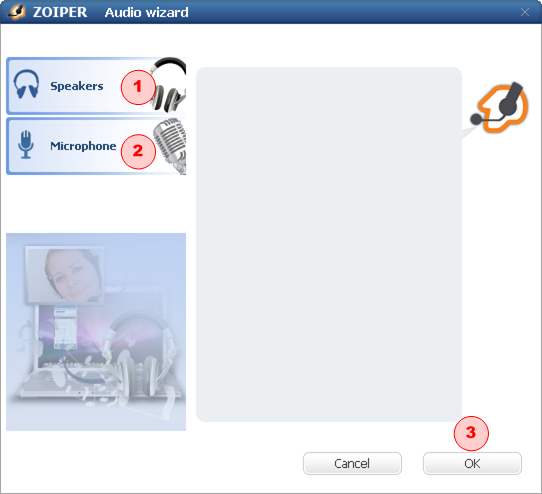
b) To test the speakers, click (1), and the Speaker test screen is displayed.
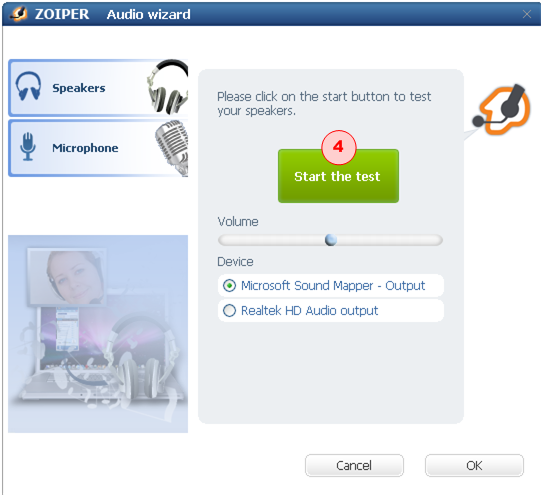
c) Click START THE TEST (4) and, if the speakers are working, you will hear the sound of a bell ringing. A message is displayed asking if you hear the sound. If you:
- Hear the bell, click YES to end the test
- Don't hear the bell, click NO and check your speakers' connections or try another set of speakers
d) Click Microphone (2) and the Microphone test screen is displayed.
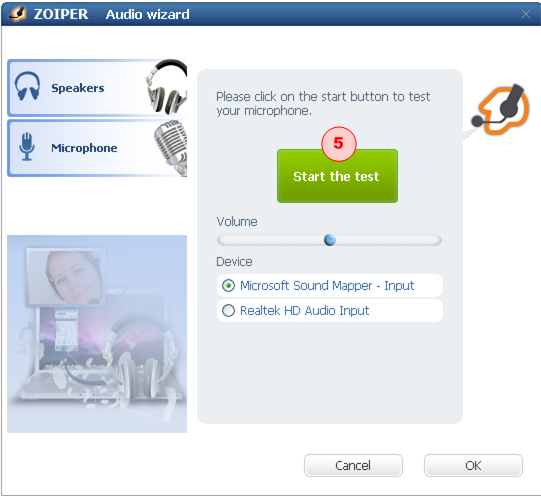
e) Click START THE TEST (5) and talk. A message is displayed asking if the volume marker moves. If:
- The Volume marker moves, your microphone is working. Click YES.
- The Volume marker does not move, click NO and check your microphone and connections
f) The test is complete, click OK and the Zoiper Audio Wizard is dismissed.
Call the test music extension
Call the Test Music extension, this is the Playback Test. To do this, click the second orange button (2) beneath the webphone shown under Theory, above.
This will show that:
- You audio out works
- The sound path from the dmSwitchboard12 works
Call the echo test extension
Call the Echo Test extension. To do this, click the third orange button (3) beneath the webphone shown under Theory, above.
When you are connected, speak and you will hear your words echoed back to you following a short delay.
This will show that:
- Your audio in is working
- The sound path from the dmSwitchboard12 works
- The link quality is acceptable in terms of dropout and latency
Step 5: Log out of your WebPhone
To log out of the WebPhone, simply close its window by clicking on the 'X' at the top right-hand side.
Next Steps
Now that you can log in and out of your WebPhone, you can learn how to make and receive calls and manage the WebPhone's in-call features.
Click here to go to Using the WebPhone: Making and receiving calls.
If you would like to carry out more tests on your WebPhone, click here: dmSwitchboard12 WebPhone: Testing.