Setting up and testing your Gigaset N300A IP
Contents
This note contains the following sections.
Objectives
Duration
Related Content
Firmware version
Theory
Pre-requisites
Setup data
Step 1: Connect the Base Station and the phone
Step 2: Retrieve your personal extension credentials
Step 3: Log in to the Base Station
Step 4: Configure your Gigaset N300 AIP handset account
Step 5: Add dmClub's provider information into the Base Station
Step 6: Add your dmSwitchboard12 VoIP credentials
Step 7: Add your dmSwitchboard12 server details
Step 8: Make some test calls
Further information
Objectives
Use this guide to:
Set up a Gigaset N300A IP handset and base station for a dmSwitchboard12 extension
By the end of this Note, you should
- Have successfully configured your Gigaset N300A IP base-station and handset for a dmSwitchboard12 extension
- Be able to make and receive internal calls using your Gigaset N300A IP handset
- Be able to make and receive external calls using your Gigaset N300A IP handset (depending on your dmSwitchboard12 plan)
Duration
These tasks should take you approximately 20 minutes.
Related content
You will need to read Note 5035 in order to complete these tasks. It tells you how to retrieve your credentials from the dmSwitchboard12.
These instructions will tell you when to open the note.
Firmware version
These instructions have been written to Firmware Version 051. Note that they may not work with other versions.
Theory
This section describes a typical set up for the Gigaset N300A IP DECT Base Station. The components are shown in the following diagram. Each of them is identified in the table, below.
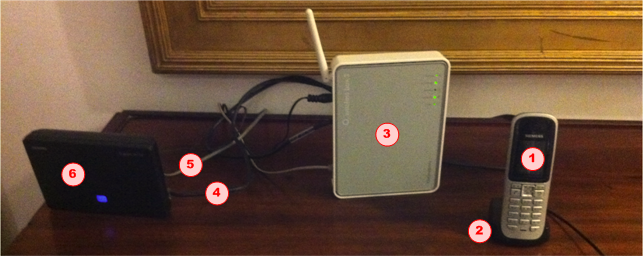
Typical DECT Setup
| 1 | DECT Handset |
4 |
RJ45 Cable |
| 2 |
DECT Handset Charger |
5 |
Analog PSTN Phone Cable |
| 3 | ADSL Router | 6 | DECT Base Station |
Your DECT Handset (1) is registered, and is connected wirelessly, to the DECT Base-Station to make and receive calls by the Analog PSTN and VoIP Accounts over the Internet.
Your DECT handset sits in its charging cradle (2).
The base station is connected to the ADSL router (3) via an RJ45 (4) or CAT5 cable. This lets it connect to the internet, and so to your dmSwitchboard12.
The Base Station is also connected to the (analog) Public Telephone Network though a Phone Cable (5).
The base station (6) has Personal Extension Credentials. These tell it how to reach the switchboard, via the internet, and how to be permitted to use it
Pre-requisites
You need all of the following to complete these instructions:
- A dmSwitchboard12 account
- An active, configured dmSwitchboard12 plan
- An internet connection
- An internet router.
Note: You need a router that is connected to an ADSL line. A USB modem will not work. - A GigasetN300AIP base-station
- A compatible handset with a charging station
Setup data
The following table lists:
- Data that you will need before you start the procedure and
- Data that will be provided during the procedure
Data that you need to hand before you start is labelled Required in the Rule & Origins Column.
Data that will become available during the procedure itself is labelled Generated in the Rule & Origins Column. Note: You should make a note of the Generated data as you will need it later in the procedure.
If the data conforms to a particular rule, or set of rules, this is highlighted in the Rule and Origin column. An example might be that any email address must be a valid email address.
| Data Name | Usage | Example | Rule & Origins |
|---|---|---|---|
| dmClub Login Details | |||
| <DMID> | The dmClubID is usually the email address with which you signed up, it's shown at the top of your Clubhouse. | fred@smithco.com | Required |
| <DM Password> | The password that you use to sign into your clubhouse. If your browser is set to remember this, you will not need it. | V3rr1S3cr3t | Required |
| Personal Extension Details | |||
| <Switchboard Account Number> | The account number of your Switchboard service |
004-0027 | Required |
| <My Extension> | The extension number for which that you are setting up this phone | 302 | Required |
| Personal Extension Credentials | |||
| <SIP Proxy and Host> | The internet address for your Switchboard. Your handset uses this to find the switchboard. | 004-0027.sb12.dmclub.org | Generated |
| <SIP Username> | The username that the phone gives to the dmSwitchboard | 0027307 |
Generated |
| <SIP Password> | The secret password that the phone gives to the switchboard | DFET-NK5R-SLPA |
Generated |
| Handset Details | |||
| <System Pin> | Used to access the Gigaset Login screen | 0000 |
Required This will be in the telephone's user manual |
Step 1: Connect the Base Station and the phone
Follow the Gigaset N300A IP Setup Guide to connect your handset and Base Station to the network and the mains power supply.
a) Plug the telephone's cradle into the mains socket. Note that there are no power lights on the cradle.
b) Place the telephone into the cradle. If the cradle is plugged in correctly, the phone's screen will be illuminated and 'Base 1' is displayed, flashing.
c) Plug the power lead into the back of the Base Station. Fit the wire into the channel provided on the back of the Base Station to maintain the connection.
d) Plug the other end of the Base Station's power lead into the mains socket.
e) Plug the RJ45 lead into the socket on the side of the BaseStation. Note that the socket at the rear of the unit is only used to make a direct connection to a telephone.
f) Plug the other end of the RJ45 cable into your VoIP LAN. The blue light on the front of the Base Station illuminates.
g) The phone should register with the Base Station. This may take a few minutes. If registration does not take place automatically, see the manufacturer's User Guide for details about how to register the handset manually.
This completes the setup of the physical units. The following steps need to be done on your PC.
Step 2: Retrieve your personal extension credentials
Before you can begin, you need to obtain the credentials for each extension that is to be connected to a Gigaset phone. These credentials will be different for each extension.
Full instructions can be found here. These instructions will open in a new window and you should be able to complete them in less than five minutes.
When you have retrieved all of the credentials that you require, continue from Step 3, below.
Step 3: Log in to the Base Station
You need to enter the extension credentials, that you retrieved in Step 2, into the Base Station.
a) Find the System Pin in the Gigaset Setup Manual. This may be in the Configuring the VoIP Connection section of the manual and is a four digit number, such as 0000. Make a note of this number as you will need it.
b) Launch a web browser on your PC.
c) Type in the URL www.gigaset-config.com and press ENTER. The Gigaset N300A IP Web Login screen is displayed.
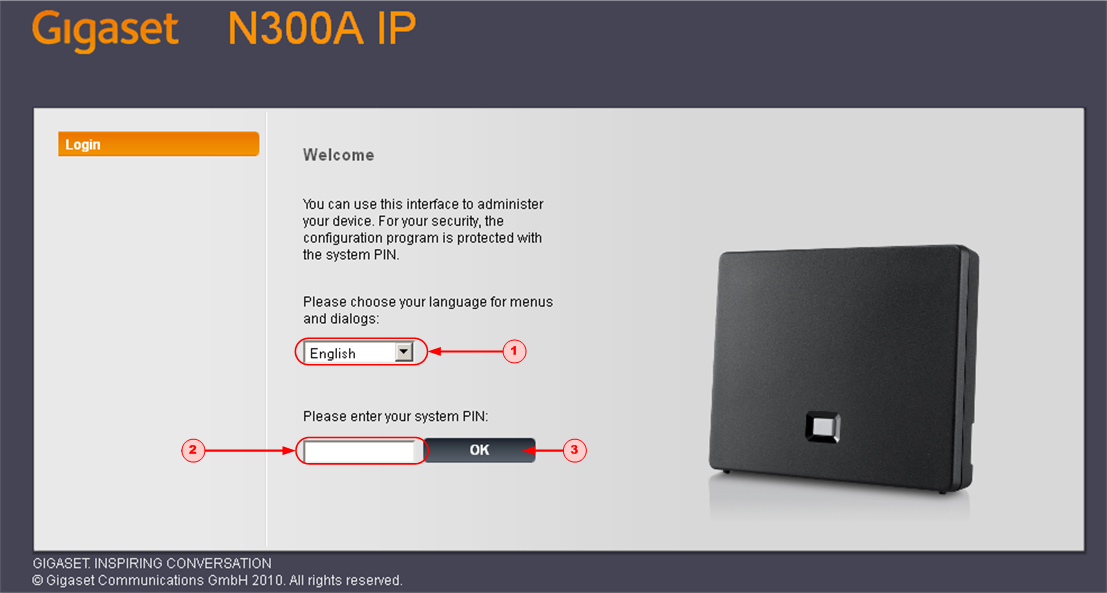
The Language field (1) defaults to English. If this is not correct, use the drop-down menu to select an appropriate language
e) Type the System PIN into the field (2) and then click OK (3). The Gigaset Main Menu is displayed.
Step 4: Configure your Gigaset N300 AIP handset account
a) On the Gigaset Main Menu, click the SETTINGS tab (1). The Settings screen is displayed.
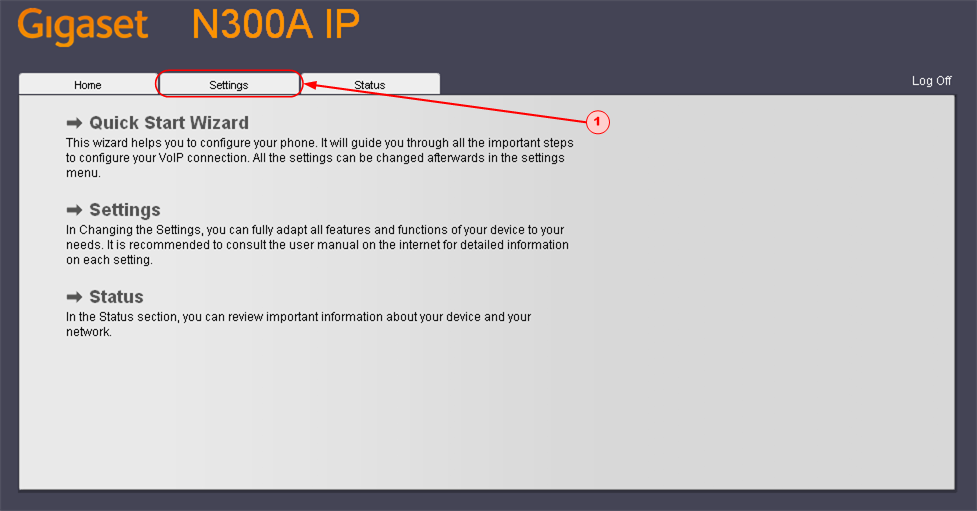
b) On the Settings Screen, click TELEPHONY (2). The Connections screen is displayed.

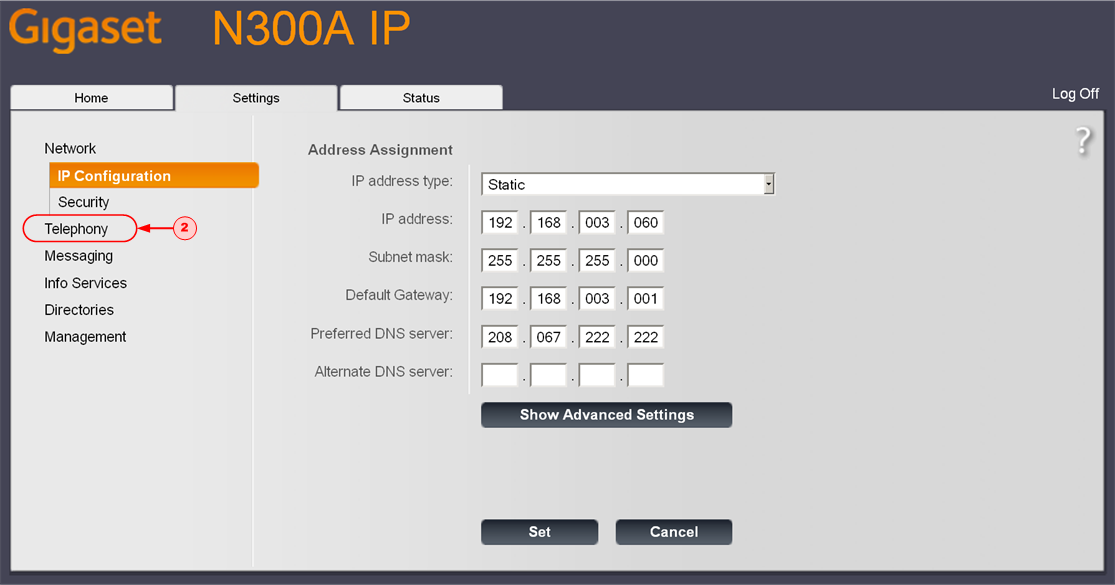
On this screen, you can see a list all the connections that you can assign or configure on your Gigaset N300AIP Base Station.
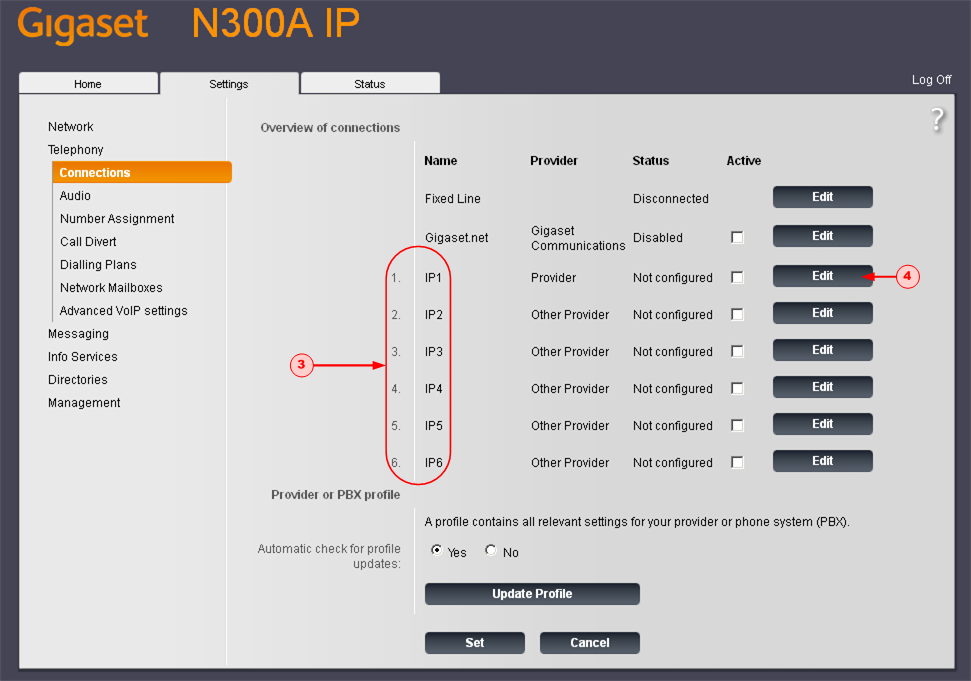
Under the Name column, you can see a list of the potential VoIP connections. They are labelled IP1, IP2 and so on (3).
c) Click EDIT alongside the IP1 VoIP connection (4). The IP Connection screen is displayed. From this screen you can start to configure the IP1 VoIP connection.
Step 5: Add dmClub's provider information into the Base Station
a) On the IP Connection screen, click START CONFIGURATION ASSISTANT (1).
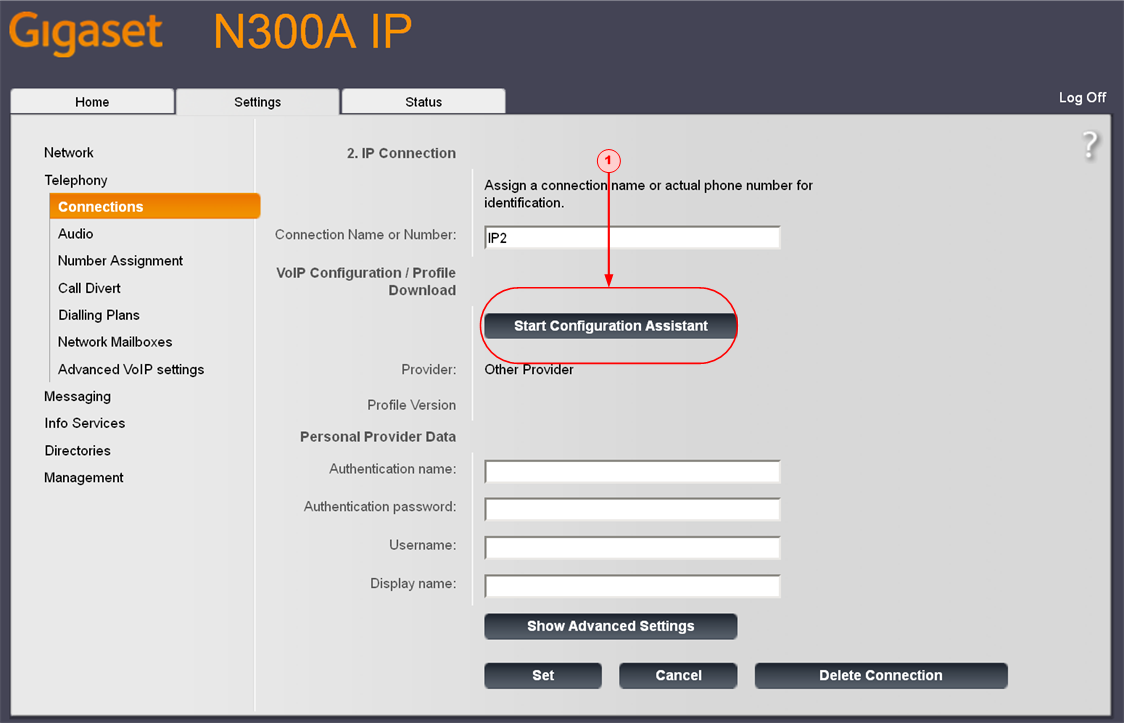
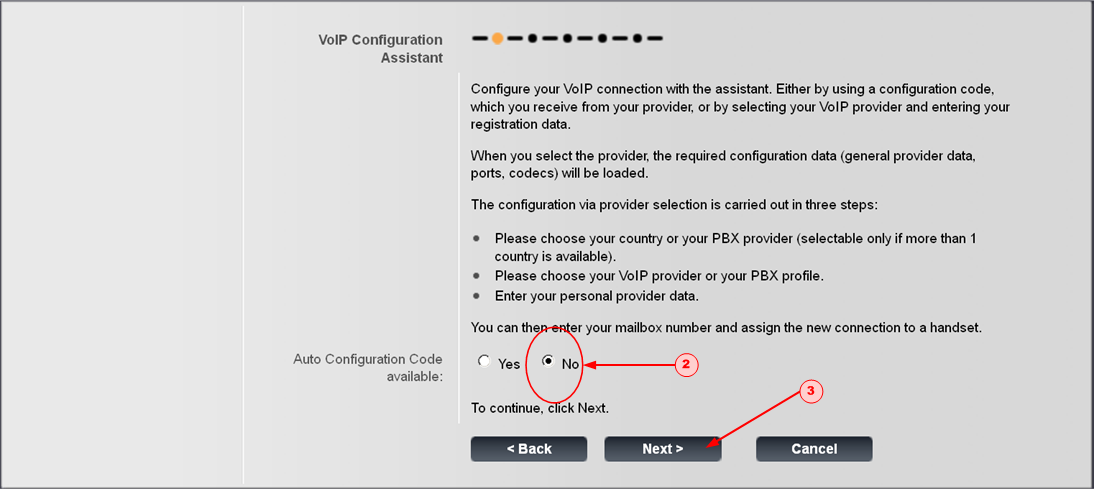
The VoIP Configuration Assitantscreen is displayed.
b) Set the Auto Configuration Code available radio button (2) to NO. Click NEXT (3).
The Country Selection screen is displayed.
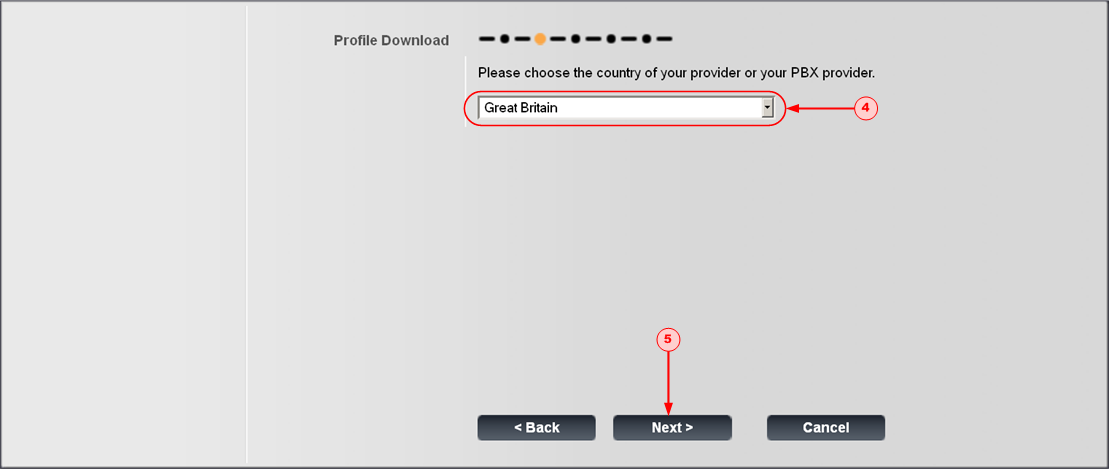
c) Select the country in which you are using the phone from the drop down list (4). Click NEXT (5).
The Provider Selection screen is displayed.
Select Other Provider from the drop down list (6) (it's at the bottom of the menu). Click NEXT (7). You are returned to the IP Connection screen.
Step 6: Add your dmSwitchboard12 VoIP credentials
Note: For this step, you will need to have the Personal Extension Credentials, that you retrieved in Step 2, to hand.
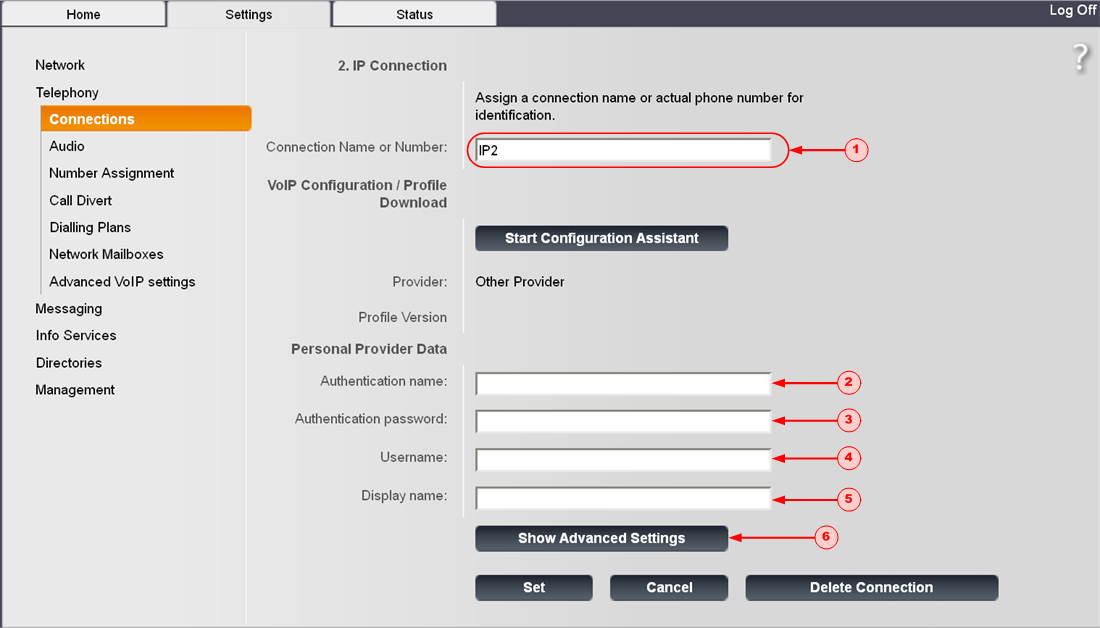
a) If you wish to give the extension a particular name or identifier, add that name to the CONNECTION NAME OR NUMBER field (1).
b) In the AUTHENTICATION NAME field (2), type in your <SIP USERNAME>.
c) In the AUTHENTICATION PASSWORD field (3), type in your <SIP PASSWORD>.
d) In the USERNAME field (4), type in your <SIP USERNAME>.
e) In the DISPLAY NAME field (5), type the name and extension number that you wish to be displayed on the telephone's handset.
When you have completed all of the fields, click SHOW ADVANCED SETTINGS (6). The Advanced Settings screen is displayed.
Step 7: Add your dmSwitchboard12 server details
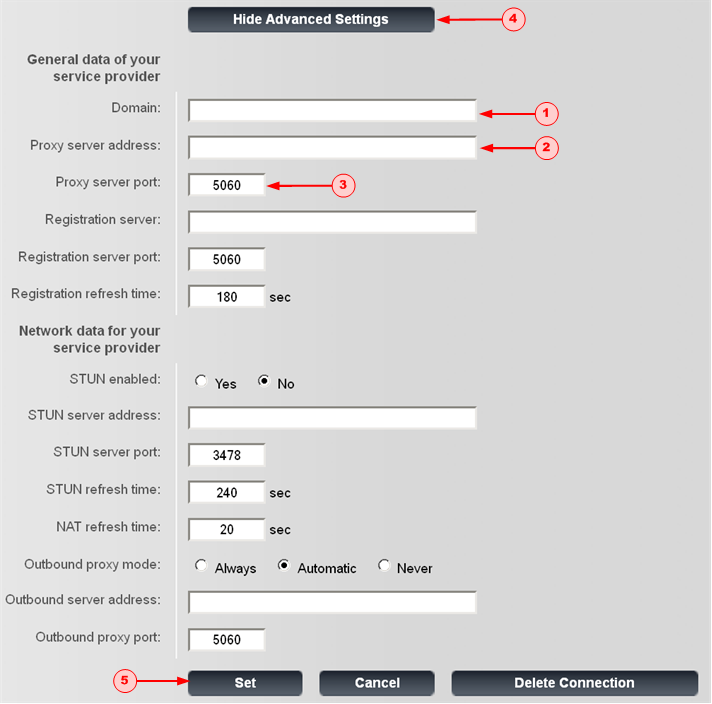
a) In the DOMAIN field (1), type in the <SIP Proxy/Host> as listed in your credentials.
b) In the PROXY SERVER ADDRESS (2) field, retype in the <SIP Proxy/Host> as listed in your credentials.
c) Check that the PROXY SERVER PORT (3) field reads 5060.
d) Click HIDE ADVANCED SETTINGS (4), the IP Connection screen is redisplayed.
e) Click SET (5). The Overview of Connections screen is redisplayed.
Configuration is now complete. You can log out of the Gigaset configurator.
Step 8: Make some test calls
This step should take you about 2 minutes.
You should carry out these tests in order: they start with the lowest possible requirements and work up to testing the full system.
a) Call the Test Music extension, #803. This will show that:
- Your audio out works
- The sound path from the dmSwitchboard12 works
b) Call the echo test extension, #801. This will show that:
- Your audio in is working
- The sound path from the dmSwitchboard12 works
- The link quality is OK in terms of dropout and latency
c) Call your mobile phone (ensuring that calls are not diverted to it). This shows that:
- You can make calls to the PSTN (Public Switched Telephone Network)
d) Call your personal extension DDI from another phone. This shows that you can receive phone calls from the PSTN.