Making and receiving calls with the WebPhone
Use this guide to
- Learn how to make, receive and end calls
- Use the WebPhone's in-call features
By the end of this guide, you should be able to:
- Use the WebPhone to make outgoing calls, receive incoming calls and manage in-call features
Contents
Duration
Related Content
Theory
Pre-requisites
Setup Data
Step 1: Making and ending a Call
Step 2: Receiving/rejecting/ignoring and ending a call
Step 3: In-call features
Step 4: The Call Log
Duration
These instruction should take you around 15 minutes to read and try out.
Related Content
Introduction to the dmSwitchboard12's Webphone
Using the WebPhone: Adding Users
Using the WebPhone: How to access the WebPhone
dmSwitchboard12: Plan creation and editing
dmSwitchboard12 WebPhone: Testing
Theory
The WebPhone is fully integrated into the dmSwitchboard12 and is the quickest and simplest way to make and receive calls from your switchboard.
These instructions tell you how to make, receive and end calls and how to use the WebPhone's in-call features.
The diagram of the WebPhone shown in Step 1, below, is referred to throughout this dmNote.
Pre-requisites
In order to follow these instructions you require:
- Access to a dmSwitchboard12
- dmCalls12 (for outgoing calls)
- A headset
- A mobile phone
Setup data
No setup data is required for these steps. It is assumed that:
- Your personal extension is already configured to work with the WebPhone and that you have received the WebPhone email invitation.
- You have downloaded and installed the plugin required to operate the WebPhone
Step 1: Making and ending a call
This step tells you how to make and end a call using the WebPhone. This diagram shows the WebPhone in use (it's making a test call to extension 803). You should refer to this diagram as you read the following instructions.
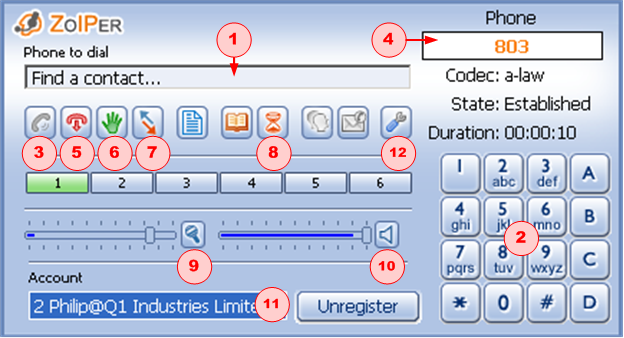
a) Enter the number into the PHONE TO DIAL field (1). You can type it in, using your keyboard, paste it in from another document or key it in using the mouse on the phone's keypad (2).
b) Click the DIAL icon (3). The number that you have dialled, along with its state, is displayed to the right of the PHONE TO DIAL field (4). After a few seconds, you will hear the other party's phone ring.
c) To end the call, click the HANGUP CALL icon (5). The call is ended and the call's status is no longer displayed on the WebPhone.
Step 2: Receiving/rejecting/ignoring and ending a call
This step tells you how to accept or reject a call using the WebPhone.
To Accept or reject an incoming call:
a) Access the WebPhone.
b) When a call is received by the dmSwitchboard12, an audible alert sounds.
You are able to set the length of time the phone will ring before the call is: sent to dmVoice; directed to voicemail or cut-off in the dmSwitchboard12 Plan Editor. See dmSwitchboard12: Plan creation and editing for detailed instructions.
At the same time, an incoming call alert (A) is displayed on top of the WebPhone and an Incoming Call Details display (B) is shown below the WebPhone. See the figure, below.
The Incoming Call Details display shows:
- The name of the company receiving the call and their dmSwitchboard12 identifier
- The name of the person, and their extension number, receiving the call
- The call's routing details: the number it has come from and the number/extension that the caller has called
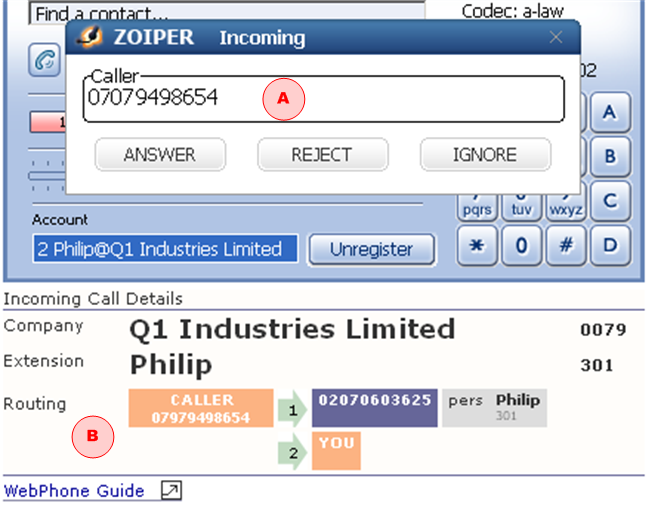

Note that this dialog may not be displayed on other browser tabs or applications. You may not see it if your browser is not displaying the WebPhone at the time of the call although you will still hear the audible alert.
To:
- Accept the call, in the Incoming dialog click ANSWER. The call is connected. The call's detail are displayed on the WebPhone (4).
- Reject the call, in the Incoming dialog click REJECT. The dialog is closed and the call is rejected.
- Ignore the call, in the Incoming dialog click IGNORE. If you choose to ignore the call, the Incoming dialog is dismissed from your screen but the call remains on the line so that another member of the team can answer it.

d) To end the call, click the HANGUP CALL icon (5). The call is ended and the call's details are no longer shown on the WebPhone. The Call Details display remains on the screen for 30 seconds after the end of the call.
Step 3: In-call features
This section tells you about the in-call handling features that are available with the WebPhone.
To put a call on hold
To put a call on hold, click the green hand icon (6). The call's state goes from Established to On-Hold. To release the call from hold, click the icon a second time.
Take/reject/ignore a second call
If you are on one call, you can take a second or even a third call at the same time. The number of simultaneous calls you can take on a number depends on your tariff.
The following steps tell you how to deal with a second incoming call:
a) When the second call is received by the dmSwitchboard12, an audible alert sounds. The Incoming dialog, shown in Step 2, is displayed on the your screen.
b) To:
- Accept the call, in the Incoming dialog click ANSWER. The call is connected. The call's details are displayed on the WebPhone.
- Reject the call, in the Incoming dialog click REJECT. The dialog is closed and the call is rejected.
- Ignore the call, in the Incoming dialog click IGNORE. If you choose to ignore the call, the Incoming dialog is dismissed from your screen but the call remains on the line so that another member of the team can answer it.
c) If you accept the call, the number two button on the WebPhone is lit as shown here.
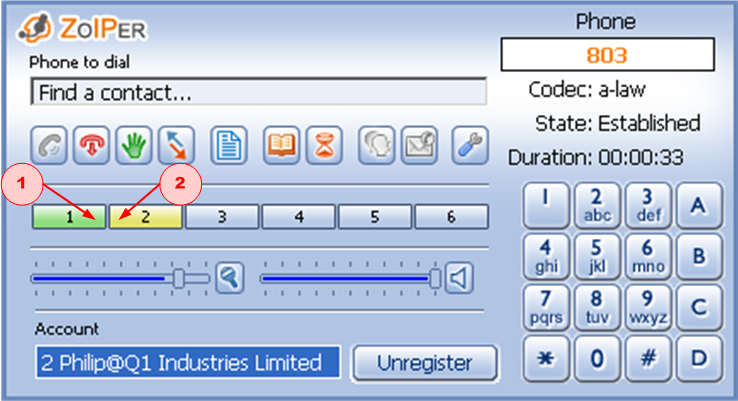
When you have more than one call, the button shows green (1) for the live call and yellow (2) for the call, or calls, that are on hold.
To switch between two calls
To switch between two calls, click the yellow button (2). The original call is put on hold, its button goes yellow, and you can have a conversation with the second caller. The second caller's button becomes green.
To Transfer a Call
The WebPhone allows you to transfer an incoming call. To transfer a call, follow these steps:
a) When you have a call on your line, and wish to transfer it to another extension, click TRANSFER (7). The Transfer window is displayed.
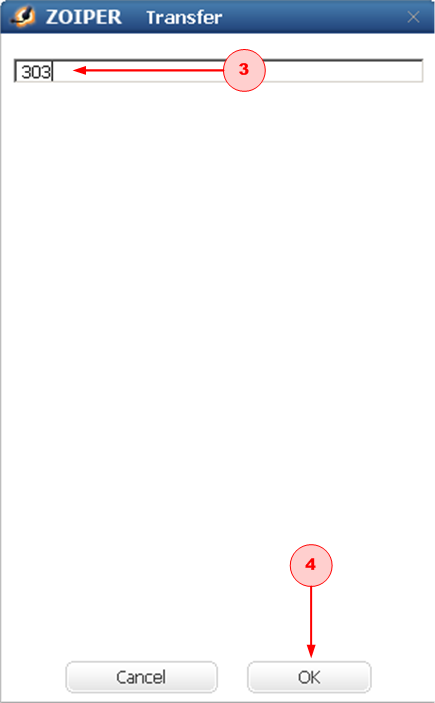
b) Type the extension number to which you wish to transfer the call into the TRANSFER field (3) and click OK. The call is immediately transferred.
Step 4: The Call Log
The Call Log contains details of all calls made or received in the current session. You access the Call Log by clicking the hourglass icon (8) on the WebPhone.
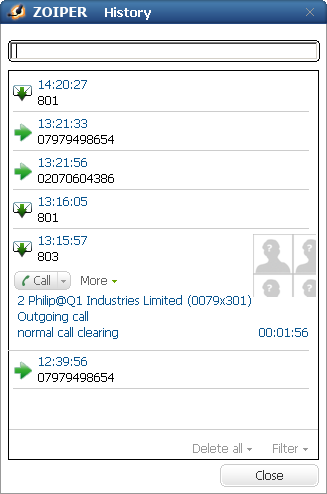
Click a call in the list to show the call's details: this diagram shows the details of the call made at 13:15. As well as viewing the call's details, you are able to call the number again from the Call Log.
Click the FILTER button at the foot of the Log to list only the following types of call:
- Missed
- Rejected
- Incoming
- Outgoing
- Unanswered
You can clear the log by clicking DELETE ALL.