
Trolley

Go to the checkout to complete your order

Search

SEARCH

Related Notes0

There are no related notes

Contents

  • 0051 Welcome to dmClub
    • 0052 What is dmClub?
      • 0119 Tangerine Telecom
    • 0053 How do I log in and what is my dmID identity?
    • 0054 Your Clubhouse: getting started
    • 0055 How do I manage my contact, company, address, login and PIN details?
    • 0056 How do I update my Clubhouse contact details?
    • 0057 Powered by GenX
    • 0058 What do I do if I want to make a complaint?
    • 0059 Reporting Unacceptable or Fraudulent Use
    • 0060 General Customer Terms and Conditions
    • 0065 dmClub Support: Our Promise
    • 0066 Getting the Best from Support
    • 0068 Advanced Fee Fraud
    • 1194 Automatic Service Upgrades
      • 1187 GenX to GenU migration
        • 1189 GenU migration FAQs
        • 1190 dmConnect to dmConnect12 upgrade
        • 1191 dmVoice to dmVoice12 upgrade
        • 1192 dmSwitchboard to dmSwitchboard12 upgrade
      • 1195 Upgrade Relocation Apr15A
      • 1196 Emergency Relocation
    • 0999 Bad dmClub numbers
    • 7000 Latest News and Updates
      • 7001 System Status and Notices
      • 7031 dmNews October 13
        • 1116 dmDeals
      • 7032 dmNews July 12
      • 7033 dmNews May 12
      • 7034 dmNews April 12
      • 7035 dmNews March 12
      • 7036 dmNews February 12
      • 7037 dmNews January 12
      • 7038 dmNews December 11
      • 7039 dmNews November 11
      • 7040 dmNews October 11
      • 7041 dmNews September 11
      • 7042 dmNews August 11
      • 7043 dmNews July 11
      • 7044 dmNews June 11
      • 7045 dmNews May 11
      • 7046 dmNews April 11
      • 7047 dmNews March 11
      • 7048 dmNews February 11
      • 7049 dmNews January 11
      • 7050 dmNews December 10
      • 7051 dmNews November 10
      • 7052 dmNews October 2010
      • 7053 dmNews September 10
      • 7054 dmNews August 10
      • 7055 dmNews July 10
      • 7056 dmNews May 10
      • 7057 dmNews April 2010
      • 7058 dmNews March 2010
      • 7059 dmNews February 10
    • 0025 Privacy Policy
  • 0100 Accounts: Credit, Orders and Payments & FAQ
    • 0016 Payment Guide
      • 1234 AutoPay concepts & advice
      • 1228 AutoPay Calendar
      • 0111 Manual Credit and Debit Card Payments
      • 0117 PayPal Payments
      • 0112 UK Bank Payments
      • 0113 Bank Payments from outside the UK
      • 0114 Payment by cheque
      • 0116 Card Auto Top-Up (Deprecated)
      • 0108 AutoPay (deprecated)
    • 1231 Understanding orders and payments
    • 0103 Buying a Service For long term or Life
    • 0105 Problem Money Allocation
    • 0115 Claiming a payout from dmClub
    • 1232 Disconnection and Reconnecting numbers
    • 0109 Placeholder
  • 0012 Products
    • 3100 Number Ranges, changes and problems
      • 3101 Non Geographic (08) Number Service Charges
        • 1200 NGN Access Charges
      • 3120 UK Local number guide
      • 3131 UK 0844 numbers guide
      • 3133 UK 0870 number guide
      • 3134 UK 0871 number guide
      • 3110 Parallel migration process
      • 1159 08 Replacement Offer - July 2015
        • 1198 08 Changes July 2015: Background
      • 1208 Legacy GenX "T0" tariffs
      • 1238 Digital Mail Number Allocations from Ofcom
      • 1242 Number Porting
      • 1178 070 number range termination
    • 0010 dmConnect12
      • 1064 dmConnect12: History and Roadmap
        • 1073 dmConnect12: Release1 (Oct13a)
        • 1161 dmConnect12 Release2 (Jun14a)
        • 1172 dmConnect12 Release3 (Sep14a)
      • 1059 dmConnect12 : Instructions
        • 1060 dmConnect12: Setting up divert - Basic Mode
        • 1061 dmConnect12: Setting up divert - Medium Mode
        • 1062 dmConnect12: Setting up divert - Advanced Mode
        • 1075 dmConnect12: Using VoIP Trunk divert mode
        • 1074 dmConnect12: Using with a dmSwitchboard12
        • 1096 dmConnect12: How it works, a technical introduction
        • 1084 Setting up Zoiper Mobile with dmConnect12
        • 1094 dmConnect12: Making outbound calls from a PSTN phone
        • 1095 dmConnect12 : Call Costs & Records
        • 1097 Using dmAnswers with dmConnect12
        • 1098 Upgrading from dmConnect12 to dmSwitchboard12
        • 1100 dmConnect12: Setting up Voicemail
        • 1091 Setting up dmWebPhone with dmConnect12
        • 1235 Setting outgoing message (OGM) for dmConnect12 from browser
        • 1241 HowTo - Setup dmConnect12 with 2 OGMs
        • 1245 HowTo - Setup dmConnect12 with Customised TTS OGM
        • 1258 HowTo - Add overflow Personal Extension to dmConnect12
      • 1063 dmConnect12: General Fault Finding
      • 1056 dmConnect12: User Case Studies
      • 1053 dmConnect12: Features
        • 1112 dmAnswers14
          • 1113 dmAnswers14: Using dmAnswers14 with dmConnect12
      • 1055 dmConnect12: Purchasing guide
      • 2071 dmConnect12: Upgrades and Add-ons
      • 1057 dmConnect12: Pricing
      • 1054 dmConnect12: FAQ Frequently Asked Questions
      • 1067 dmConnect12: Embedded Notes
        • 1068 dmConnect12: OPH ControlX:Home
        • 1018 dmConnect12/PSB: OPH ControlX:Home
        • 1019 dmConnect12/PSB: OPH ControlX:CallHandling
        • 1069 dmConnect12: OPH ControlX:Divert
        • 1070 dmConnect12: OPH ControlX:Call Records
        • 1071 dmConnect12: OPH ControlX:Tariff
        • 1052 dmConnect12: OPH ControlX:DMC12Tariff
    • 0019 GenU General Help
      • 1203 Fault-finding VoIP handsets & Clients
      • 0107 Unclassified OnPageHelp
        • 1233 AutoPay OPH
      • 1237 Setting up voicemail OGM for dmConnect12 and dmSwitchboard12
      • 1244 Call Records Availability
      • 1249 GenU General: Feature List
        • 1250 GenU General: Web Prompt Studio Feature
      • 1251 GenU General: Web Prompt Studio - Getting started instructions
        • 1252 GenU General: WebPrompt Studio - Advanced Instructions
    • 5017 dmSwitchboard12
      • 5021 dmSwitchboard12: Getting started
        • 5022 dmSwitchboard12: Plan creation and editing
        • 5023 dmSwitchboard12: Setup Videos
      • 0400 dmSwitchboard12 Features
        • 5024 dmSwitchboard12 Extensions: Overview
        • 5025 dmSwitchboard12 Extensions: Reception
          • 5212 Reception Extensions - Advanced Options
        • 5026 dmSwitchboard12 Extensions: Team
          • 5213 Team Extensions - Advanced Options
        • 5027 dmSwitchboard12 Extensions: Personal
          • 5214 Personal Extensions - Advanced Options
          • 5041 Divert dmSwitchboard12 to PSTN
        • 5028 dmSwitchboard12 Extensions: Utility
        • 5066 dmSwitchboard12 Voicemail
          • 1108 PS12 voicemail OGMs
        • 5070 dmSwitchboard12 Call Records
        • 5071 PSTN Extension Calls
        • 5072 Transferring Calls with Mid Call Menu
        • 5200 dmSwitchboard12 Voiceover
          • 5203 dmSwitchboard12 Voiceover Instructions
          • 5209 Recording prompts over the phone
          • 5230 Move from CloudSafe to SwissDisk Instructions
        • 5210 SB12 Click2Call
        • 1005 dmSwitchboard12 Opening Hours Feature
        • 1004 dmSwitchboard12 CallerID and Enhanced Caller Info
        • 1139 dmSwitchboard12: Advanced SIP Diagnostics
        • 1247 Web Prompt Studio
      • 5043 The dmSwitchboard12 WebPhone
        • 5067 Getting Started with the WebPhone
        • 5044 How To Access the WebPhone
        • 5047 Adding WebPhone Users
        • 5048 Testing the WebPhone
        • 5056 Making and Receiving Calls and In-call Features
        • 5211 WebPhone Screen Popping
      • 5000 Using dmSwitchboard12 with SIP and Softphones
        • 5049 dmSwitchboard12: Start using dmSwitchboard12 with a SIP Phone
        • 5035 Retrieve your SIP credentials from dmSwitchboard12
        • 5050 dmSwitchboard12 guides: LAN checklist for VoIP
        • 5046 VoIP Testing and Test Resources
        • 5045 SIP Phones Synonyms
        • 5033 Bria for Android: Setup and Testing
        • 5034 Bria for iPhone and iPad: Setup and Testing
        • 5042 CounterPath's X-Lite 4: Setup and Testing
        • 5005 Gigaset N300A IP: Setup
        • 5008 Grandstream GXP2000: Setup
        • 5007 Linksys Sipura IP SPA922: Setup
        • 5006 SIPPolycom SoundPoint IP 331: Setup
        • 1080 Using dmConnect12/dmSwitchboard12 with FreePbx
        • 1255 Setting up Zoiper Desktop Application
      • 5106 dmSwitchboard12 Call Costs
      • 5020 dmSwitchboard12 Case Studies
      • 1013 SB12 Contracts
      • 1011 SB12: FAQ Frequently Asked Questions
      • 1173 dmSwitchboard12: Upgrades and add-ons
      • 1007 dmSwitchboard12: History & Roadmap
        • 5055 dmSwitchboard12 Release2 (May13a)
          • 1010 dmSwitchboard12: Migration from V1 to V2 Instructions
        • 1162 dmSwitchboard12 Release3 (Jun14a)
        • 1171 dmSwitchboard12 Release4 (Sep14a)
      • 1175 dmSwitchboard12 General Fault-finding
    • 0017 dmAnswers14
      • 1136 dmAnswers14: Getting started instructions
        • 1122 dmAnswers14: Setting up dmAnswers14 Message Desk on dmConnect12
        • 1124 dmAnswers14: Setting up dmAnswers14 FrontDesk on dmConnect12
        • 1129 dmAnswers14: Installing dmConsole on Android
        • 1123 dmAnswers14: Installing dmConsole on iPhone/iPad
        • 1163 dmAnswers14: Initial Setup ProTime Customer Guide
      • 1120 dmAnswers14: Features
        • 1140 dmAnswers14: MessageDesk
        • 1166 dmAnswers14: FrontDesk
        • 0104 dmAnswers14: dmConsole
        • 1167 dmAnswers14: Agent Handling Mode
        • 1149 dmAnswers14: Transfer Modes
        • 1134 dmAnswers14: Notifications
        • 1168 dmAnswers14: Call Records
      • 1121 dmAnswers14: Pricing
      • 1132 dmAnswers14: Purchasing guide
      • 1138 dmAnswers14: Money-saving tips
      • 1125 dmAnswers14: FAQs
      • 1130 dmAnswers14: Additional terms and conditions
      • 1131 dmAnswers14: Advanced topics
        • 1126 dmAnswers14: Basic agent training
        • 1133 dmAnswers14: History and roadmap
          • 1170 dmAnswers14 Version 1.6 Commercial Gold Release Notice An14v1-6cg
          • 1174 dmAnswers14 Version 1.6 Commercial Gold Release Notice An14v1-6cg
          • 1188 dmAnswers14: version 2 Commercial Gold Release Notice An14v2cg
      • 1169 dmAnswers14: General Fault-finding
        • 1248 Clubhouse Lockout
      • 0018 dmAnswers14: Paks for fixed costs
        • 1181 dmAnswers14: Pak Pricing
        • 1182 dmAnswers14: Pak FAQ
        • 1183 dmAnswers14: Pak Records
    • 0023 dmConnects App
    • 0024 dmConnects API -RFC
    • 5100 dmCalls12
      • 5101 dmCalls12 Features
      • 5102 dmCalls12 Tariffs
      • 5221 dmCalls12 Indirect Access
      • 5103 dmCalls12 Faultfinding 5103
      • 5220 dmCalls12 Reporting Problem Destinations
      • 5104 dmCalls12 Supplementary Terms and Conditions
      • 0120 dmDialler
    • 3310 dmVoice and dmFax
      • 3311 Getting started with dmVoice
      • 3312 Getting started with dmFax
      • 3313 Set up your voicemail message for dmVoice
      • 3314 Access your voicemail
      • 3315 View a list of calls or messages you've received
      • 3316 dmFax fax to email settings
      • 3317 Sample voice messages
      • 3318 Sample fax messages
      • 3320 Control dmVoice or dmFax online
      • 3321 Control dmVoice or dmFax over the phone
      • 3323 Change my dmVoice or dmFax email or PIN
      • 3324 Change dmVoice divert settings
      • 3325 dmVoice voicemail and notification settings
      • 3326 Change dmFax divert settings
    • 5081 ProTime
      • 5095 ProTime topics
      • 5082 Setup ProTime for dmSwitchboard12
      • 5083 Full Service ProTime dmSwitchboard12
      • 5084 50/50 ISU ProTime for the dmSwitchboard12
      • 5085 DIY dmSwitchboard12
      • 5090 dmSwitchboard12: Initial Setup Planning Sheet Guide
      • 5096 ProTime Supplementary Terms and Conditions
      • 1223 ProTime: Designing your Business Call Flow
      • 0110 ClubTime - Free Pro Support, solutions
      • 1257 ProVoiceover for Cn12, Sb12
    • 0011 dmConnect Classic
      • 3511 dmConnect: Diverting to VoIP
      • 1106 dmConnect: Buyers Guide
      • 1107 dmConnect: Upgrade options
    • 3410 dmSwitchboard Classic
      • 3420 Getting started part 1 - script wizard
      • 3421 Getting started part 2 - sounds wizard
      • 3422 Media players on the PC
      • 3424 Controlling your dmSwitchboard over the phone
      • 3426 dmSwitchboard: create an information line
      • 3427 dmSwitchboard: create your own recorded voice prompts
      • 3430 Development numbers
      • 3460 dmSwitchboard MidCallServices
      • 3440 dmSwitchboard FAQs
      • 3412 Minimum usage on 070 dmSwitchboard
      • 4130 dmAnswers and dmSwitchboard
      • 4140 How much does it cost?
    • 2110 dmCalls Classic
      • 2112 Getting started
      • 2120 Access
      • 2121 Dialling options: how to make a call
      • 2122 Command and Help modes
      • 2130 Security
      • 2131 Address book
      • 2132 Online itemised calls
      • 2133 Voice training
      • 2150 dmCalls: Frequently Asked Questions
      • 2111 Your prepay account is not ready
    • 0118 Future Features
  • 0042 Express Support
    • 1210 Account balance problems
    • 1218 General problems with account funding
    • 1224 I want my number reconnected
    • 1225 My account balance is shrinking too quickly
    • 1211 My telephone number isn't working
    • 1212 My fax number isn't working
    • 1213 I can't login to my clubhouse
    • 1215 I'm trying to buy a new number but your website won't let me
    • 1219 I have a general call-handling problem
    • 1214 My number's control panel isn't working
    • 1220 I’m having a problem with one of your websites
    • 1299 I've got a problem not covered here
    • 1217 Faxes are garbled
    • 1221 General message notification problems
  • 1222 Customer VOIP tips
  • 1229 Keeping your number
  • 0998 0161 Nuisance calls
  • 1157 OPH PSB Call Records
  • 1301 club.dm end of life
  • 9997 03 Numbers Sales Test Page
  • 9996 Demo of FedSessKey pass through
  • 0013 Support
  • 1256 dmClub Number API
  • 1180 dmAnswers migration
CONTENTS

Show full Support Notebook

#5005

Gigaset N300A IP: Setup


Show All Steps

Setting up and testing your Gigaset N300A IP

Contents

This note contains the following sections.

Objectives
Duration
Related Content
Firmware version
Theory
Pre-requisites
Setup data
Step 1: Connect the Base Station and the phone
Step 2: Retrieve your personal extension credentials
Step 3: Log in to the Base Station
Step 4: Configure your Gigaset N300 AIP handset account
Step 5: Add dmClub's provider information into the Base Station
Step 6: Add your dmSwitchboard12 VoIP credentials
Step 7: Add your dmSwitchboard12 server details
Step 8: Make some test calls
Further information

Objectives

Use this guide to:

Set up a Gigaset N300A IP handset and base station for a dmSwitchboard12 extension

By the end of this Note, you should

  • Have successfully configured your Gigaset N300A IP base-station and handset for a dmSwitchboard12 extension
  • Be able to make and receive internal calls using your Gigaset N300A IP handset
  • Be able to make and receive external calls using your Gigaset N300A IP handset (depending on your dmSwitchboard12 plan)

Duration

These tasks should take you approximately 20 minutes.

Related content

You will need to read Note 5035 in order to complete these tasks. It tells you how to retrieve your credentials from the dmSwitchboard12.

These instructions will tell you when to open the note.

Firmware version

These instructions have been written to Firmware Version 051. Note that they may not work with other versions.

Theory

This section describes a typical set up for the Gigaset N300A IP DECT Base Station. The components are shown in the following diagram. Each of them is identified in the table, below.
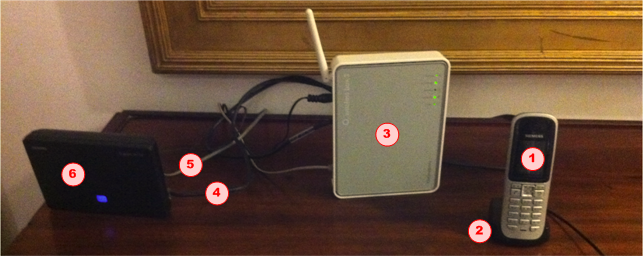
Typical DECT Setup

1 DECT Handset
4
RJ45 Cable
2
DECT Handset Charger
5
Analog PSTN Phone Cable
3 ADSL Router 6 DECT Base Station


Your DECT Handset (1) is registered, and is connected wirelessly, to the DECT Base-Station to make and receive calls by the Analog PSTN and VoIP Accounts over the Internet.

Your DECT handset sits in its charging cradle (2).

The base station is connected to the ADSL router (3) via an RJ45 (4) or CAT5 cable. This lets it connect to the internet, and so to your dmSwitchboard12.

The Base Station is also connected to the (analog) Public Telephone Network though a Phone Cable (5).

The base station (6) has Personal Extension Credentials. These tell it how to reach the switchboard, via the internet, and how to be permitted to use it

Pre-requisites

You need all of the following to complete these instructions:

  • A dmSwitchboard12 account
  • An active, configured dmSwitchboard12 plan
  • An internet connection
  • An internet router.
    Note: You need a router that is connected to an ADSL line. A USB modem will not work.
  • A GigasetN300AIP base-station
  • A compatible handset with a charging station

Setup data

The following table lists:

  • Data that you will need before you start the procedure and
  • Data that will be provided during the procedure

Data that you need to hand before you start is labelled Required in the Rule & Origins Column.

Data that will become available during the procedure itself is labelled Generated in the Rule & Origins Column. Note: You should make a note of the Generated data as you will need it later in the procedure.

If the data conforms to a particular rule, or set of rules, this is highlighted in the Rule and Origin column. An example might be that any email address must be a valid email address.

Data Name Usage Example Rule & Origins
dmClub Login Details
<DMID> The dmClubID is usually the email address with which you signed up, it's shown at the top of your Clubhouse. fred@smithco.com Required
<DM Password> The password that you use to sign into your clubhouse.  If your browser is set to remember this, you will not need it. V3rr1S3cr3t Required
Personal Extension Details
<Switchboard Account Number> The account number of your Switchboard service   
004-0027 Required
<My Extension> The extension number for which that you are setting up this phone 302 Required
Personal Extension Credentials
<SIP Proxy and Host> The internet address for your Switchboard. Your handset uses this to find the switchboard. 004-0027.sb12.dmclub.org Generated
<SIP Username> The username that the phone gives to the dmSwitchboard 0027307   
Generated
<SIP Password> The secret password that the phone gives to the switchboard DFET-NK5R-SLPA
Generated
Handset Details
<System Pin> Used to access the Gigaset Login screen 0000

Required

This will be in the telephone's user manual

Step 1: Connect the Base Station and the phone

Follow the Gigaset N300A IP Setup Guide to connect your handset and Base Station to the network and the mains power supply.

a) Plug the telephone's cradle into the mains socket. Note that there are no power lights on the cradle.

b) Place the telephone into the cradle. If the cradle is plugged in correctly, the phone's screen will be illuminated and 'Base 1' is displayed, flashing.

c) Plug the power lead into the back of the Base Station. Fit the wire into the channel provided on the back of the Base Station to maintain the connection.

d) Plug the other end of the Base Station's power lead into the mains socket.

e) Plug the RJ45 lead into the socket on the side of the BaseStation. Note that the socket at the rear of the unit is only used to make a direct connection to a telephone.

f) Plug the other end of the RJ45 cable into your VoIP LAN. The blue light on the front of the Base Station illuminates.

g) The phone should register with the Base Station. This may take a few minutes. If registration does not take place automatically, see the manufacturer's User Guide for details about how to register the handset manually.

This completes the setup of the physical units. The following steps need to be done on your PC.

Step 2: Retrieve your personal extension credentials

Before you can begin, you need to obtain the credentials for each extension that is to be connected to a Gigaset phone. These credentials will be different for each extension.

Full instructions can be found here. These instructions will open in a new window and you should be able to complete them in less than five minutes.

When you have retrieved all of the credentials that you require, continue from Step 3, below.

Step 3: Log in to the Base Station

You need to enter the extension credentials, that you retrieved in Step 2, into the Base Station.

a) Find the System Pin in the Gigaset Setup Manual. This may be in the Configuring the VoIP Connection section of the manual and is a four digit number, such as 0000. Make a note of this number as you will need it.

b) Launch a web browser on your PC.

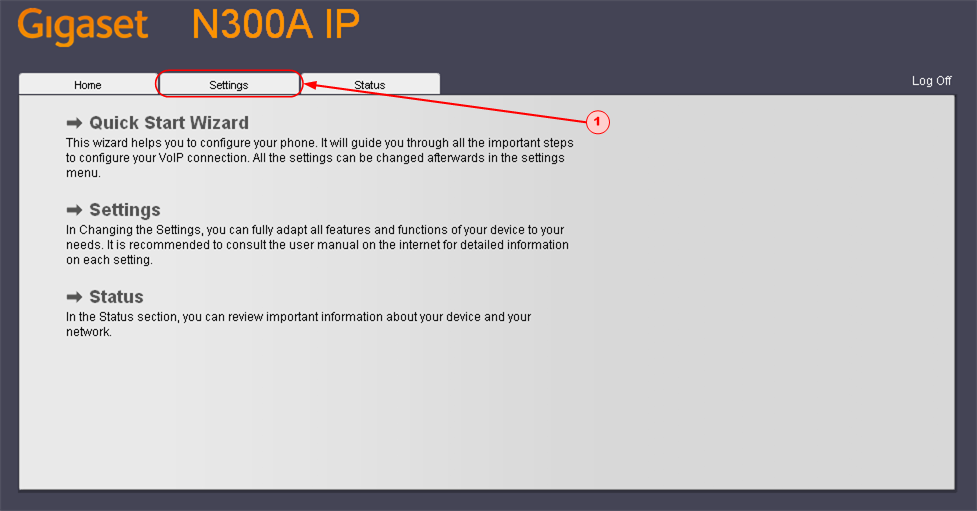
c) Type in the URL www.gigaset-config.com and press ENTER. The Gigaset N300A IP Web Login screen is displayed.


The Language field (1) defaults to English.  If this is not correct, use the drop-down menu to select an appropriate language

e) Type the System PIN into the field (2) and then click OK (3). The Gigaset Main Menu is displayed.

Step 4: Configure your Gigaset N300 AIP handset account

a) On the Gigaset Main Menu, click the SETTINGS tab (1). The Settings screen is displayed.


b) On the Settings Screen, click TELEPHONY (2). The Connections screen is displayed.


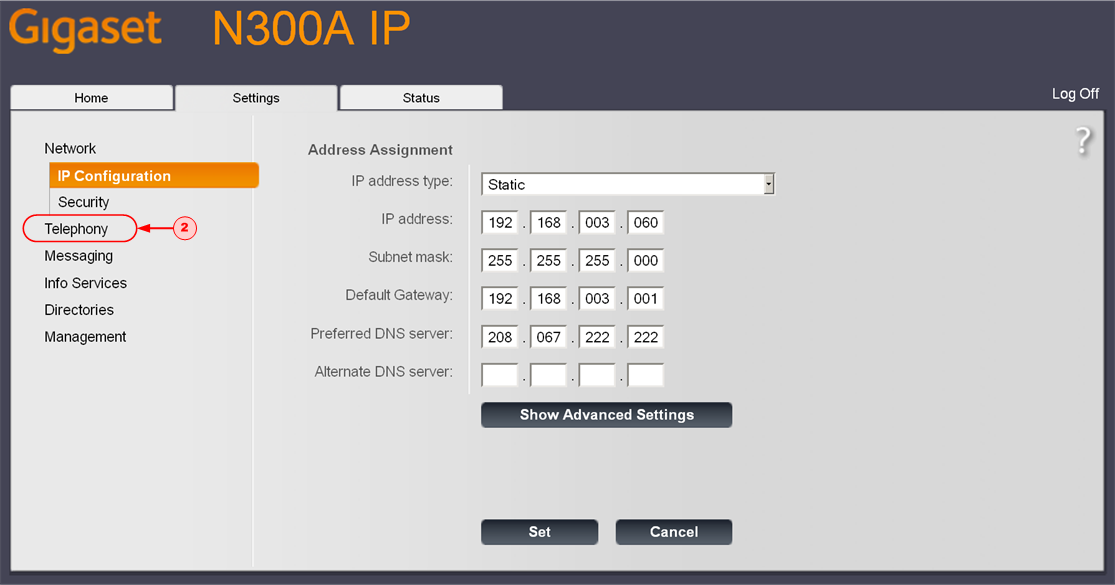
On this screen, you can see a list all the connections that you can assign or configure on your Gigaset N300AIP Base Station.


Under the Name column, you can see a list of the potential VoIP connections. They are labelled IP1, IP2 and so on (3).

c) Click EDIT alongside the IP1 VoIP connection (4). The IP Connection screen is displayed. From this screen you can start to configure the IP1 VoIP connection.

Step 5: Add dmClub's provider information into the Base Station

a) On the IP Connection screen, click START CONFIGURATION ASSISTANT (1).


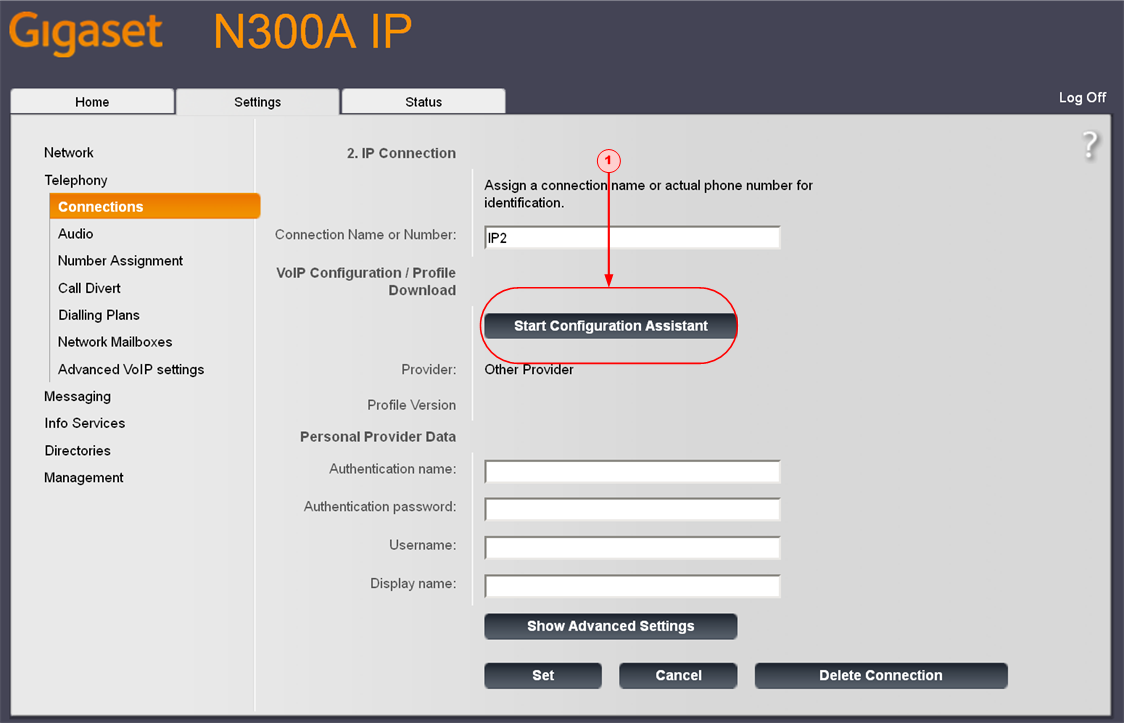
The VoIP Configuration Assitantscreen is displayed.

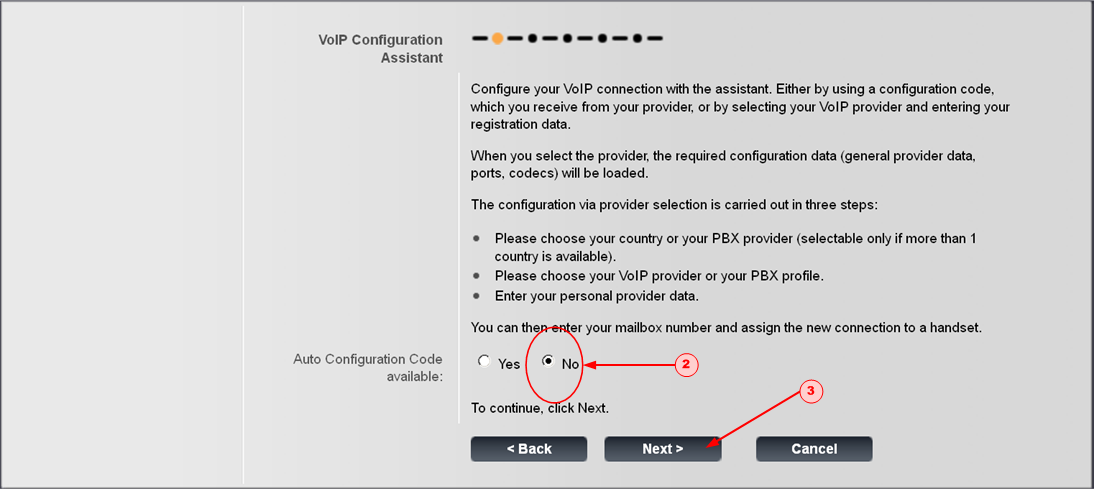
b) Set the Auto Configuration Code available radio button (2) to NO. Click NEXT (3).


The Country Selection screen is displayed.


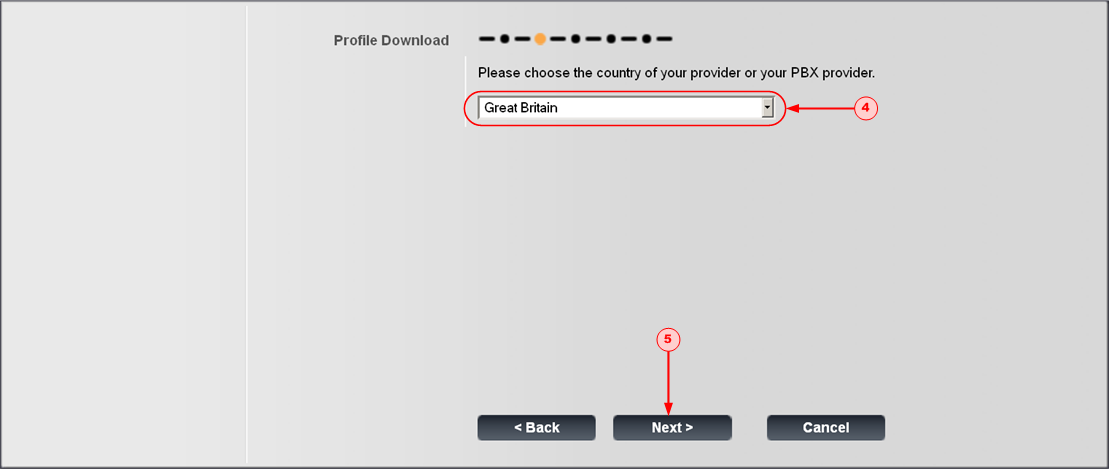
c) Select the country in which you are using the phone from the drop down list (4). Click NEXT (5).

The Provider Selection screen is displayed.


Select Other Provider from the drop down list (6) (it's at the bottom of the menu). Click NEXT (7). You are returned to the IP Connection screen.

Step 6: Add your dmSwitchboard12 VoIP credentials

Note: For this step, you will need to have the Personal Extension Credentials, that you retrieved in Step 2, to hand.


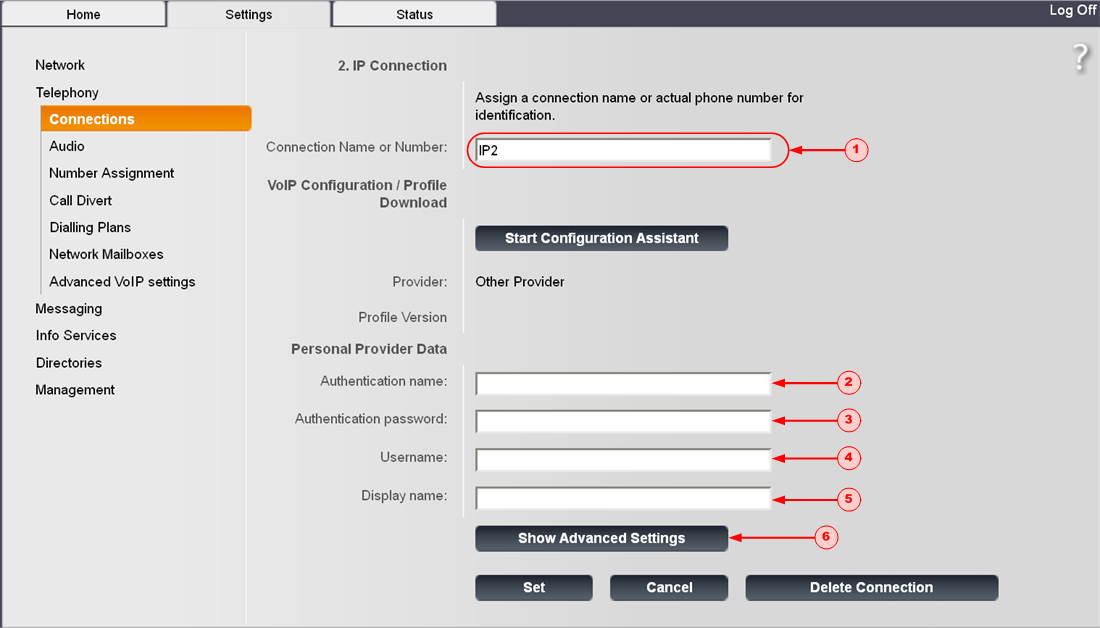
a) If you wish to give the extension a particular name or identifier, add that name to the CONNECTION NAME OR NUMBER field (1).

b) In the AUTHENTICATION NAME field (2), type in your <SIP USERNAME>.

c) In the AUTHENTICATION PASSWORD field (3), type in your <SIP PASSWORD>.

d) In the USERNAME field (4), type in your <SIP USERNAME>.

e) In the DISPLAY NAME field (5), type the name and extension number that you wish to be displayed on the telephone's handset.

When you have completed all of the fields, click SHOW ADVANCED SETTINGS (6). The Advanced Settings screen is displayed.

Step 7: Add your dmSwitchboard12 server details


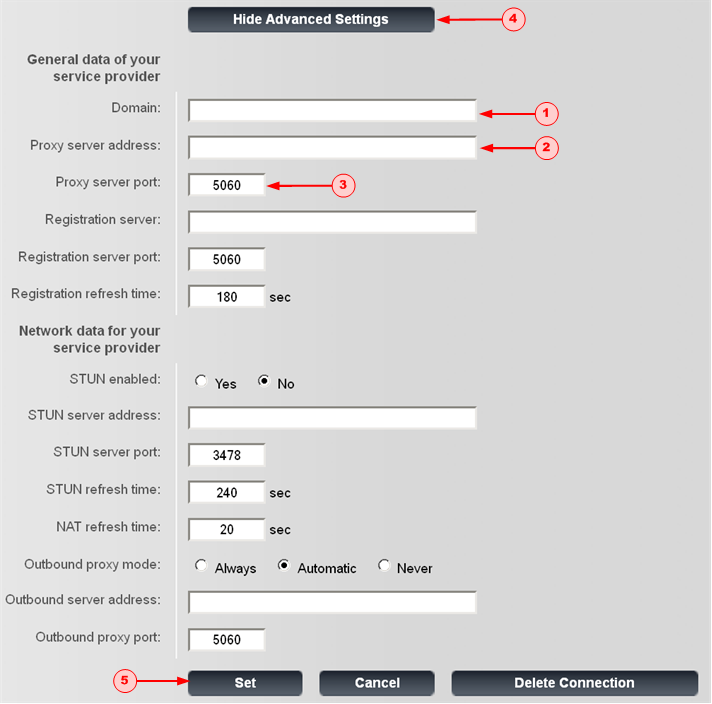
a) In the DOMAIN field (1), type in the <SIP Proxy/Host> as listed in your credentials.

b) In the PROXY SERVER ADDRESS (2) field, retype in the <SIP Proxy/Host> as listed in your credentials.

c) Check that the PROXY SERVER PORT (3) field reads 5060.

d) Click HIDE ADVANCED SETTINGS (4), the IP Connection screen is redisplayed.

e) Click SET (5). The Overview of Connections screen is redisplayed.

Configuration is now complete. You can log out of the Gigaset configurator.

Step 8: Make some test calls

This step should take you about 2 minutes.

You should carry out these tests in order: they start with the lowest possible requirements and work up to testing the full system.

a) Call the Test Music extension, #803. This will show that:

  • Your audio out works
  • The sound path from the dmSwitchboard12 works

b) Call the echo test extension, #801. This will show that:

  • Your audio in is working
  • The sound path from the dmSwitchboard12 works
  • The link quality is OK in terms of dropout and latency

c) Call your mobile phone (ensuring that calls are not diverted to it). This shows that:

  • You can make calls to the PSTN (Public Switched Telephone Network)

d) Call your personal extension DDI from another phone. This shows that you can receive phone calls from the PSTN.

You are not logged in
version infortmation missing